Server Preferences Management Locate
Overview Locate
Server Preferences refer to the global settings of WSO2 SOA Enablement Server for Java. These fall into four areas: Default Protocol Properties, Hot Deployment, Security Settings and Transport Settings.
To access the global settings, use subnodes of the Server Preferences tree node of the Administration Console. Clicking on the Server Preferences tree node loads an introduction page. Click on the relevant Server Preferences subnode to access the desired preference.
Default Protocol Properties Locate
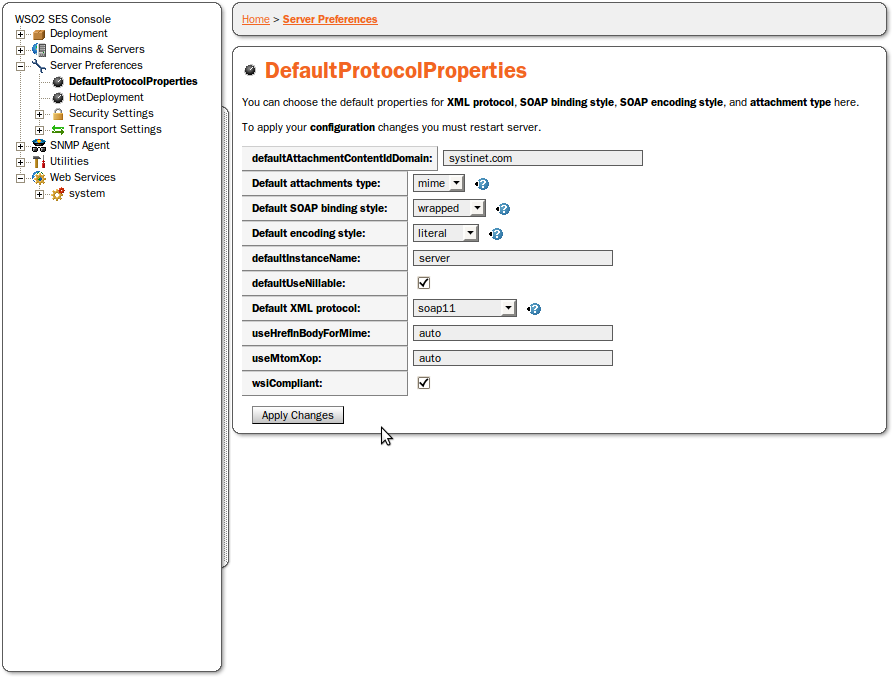
The DefaultProtocolProperties form allows you to set the default attachment type (MIME/DIME), SOAP Binding Style (document/rpc), encoding type (literal/encoded) and XML Protocol (SOAP 1.1, 1.2), as shown in Figure 41.
This is the same choice given to you at installation. The options are described in the Default Options section of the Wizard Installation chapter in the Installation and Porting Guide.
![[Note]](images/note.gif) | Note |
|---|---|
These options can also be changed manually, in the <preferences name="main"/> element of WASP_HOME/conf/serverconf.xml and WASP_HOME/conf/clientconf.xml. Details are given in the code comments therein. | |
Setting Hot Deployment Locate
Hot deployment is a method for quickly deploying a package on a running server. We recommend using it only for testing or evaluation. Using hot deployment in a production environment is not recommended as it may decrease performance.
By default, hot deployment is enabled, with a scan period of 5000 ms. Hot deployment can be disabled or the scan period changed in the HotDeployment form, loaded by clicking on the HotDeployment subnode of the Security tree node.
For more information on Hot Deployment, please see 'Hot' Deployment.
Security Preferences Locate
The Security Settings tree node takes you to the following forms:
This is where Access Controller can be configured.
Customize the security framework by properties.
Choose which security providers WSO2 SOA Enablement Server will use.
Globally set algorithm, context time-to-live, quality of protection and sweep interval.
Globally set privateState (yes/no), serviceIdentities and serviceRealm.
WS-Security
Set the default, global configuration of WS-Security Provider. Please see the Low-level Configuration section of the WS-Security Provider chapter.
This is where configuration of the User Store and Key Store can be changed.
The configuration for the updateable Policy can be adjusted here.
Access Controllers Locate
The Access Controllers form allows you to view and change the Access Controller configuration (Please see The Authorization Model in WSO2 SOA Enablement Server.
The configuration is the same as the configuration for the updateable Policy (Please see updateable Policy Preferences).
The panel contains a table listing Access Controller properties by name and value. Take care when changing these manually. You can also click on the relevant buttons to Remove property or Apply Changes.
The field Provider Class Name contains the name of the class that implements the Access Controller.
Remember to click the Apply Changes button after making your changes.
Properties Locate
The Properties Preferences form lets you dynamically add properties affecting the entire security framework. WSO2 SOA Enablement Server comes with one property, the PStore.
You can customize WSO2 SOA Enablement Server by adding more properties. Click Add Item to add a property.
Providers Locate
To choose which security providers WSO2 SOA Enablement Server will use, click on the Providers tab. You will see a table listing all WSO2 SOA Enablement Server implementations of standard security protocols. You may add an additional protocol, including your own custom protocol, by clicking on the Add Protocol button (please see the Provider Model section in the Security Configuration chapter of the Security book). WSO2 SOA Enablement Server comes with the following protocols:
Secure Socket Layer (SSL)
HTTP Basic Access Authentication
HTTP Digest Access Authentication
Kerberos
WS-Security
Siteminder
The security providers table in this form is organized into the following columns:
Accepting
This check box is selected if the Security Provider is used to accept calls for establishing a security context from a remote system.
Class
Name of the class that implements the security protocol in the WSO2 SOA Enablement Server API.
Name
Name of the Security Provider.
Remove Provider removes the provider in that row.
Add additional providers by clicking on Add Provider.
The menu Initiating Security Provider determines the provider used to establish a security context to a remote system.
After setting the appropriate Security Preferences, click the Apply Changes button. Pressing this button saves your changes to the server's configuration.
HttpDigest Locate
The HttpDigest form contains fields for globally setting the algorithm, context time-to-live, quality of protection and sweep interval. The options for a field are given in a screen tip box when you hold the cursor over the field.
KerberosProvider Locate
The KerberosProvider form allows you to set the following properties:
privateState (true/false) - Relevant for a client that initiates GSSContext. Messages will be encrypted if set to true (done by ticking the box).
serviceIdentities - Clicking the Add item button opens identity and URI fields for a new identity. Clicking the Del item button deletes an identity.
serviceRealm Indicates the realm (KDC) used by a service when it is different than the one used by the client.
PStore Initial Parameters Locate
Use the PStore form, shown in Figure 42, to view and change User Store and Key Store configurations. (See the section Keystore and User Store.)
You can also configure property serializers here. Their configuration is similar to those of the updateable Policy (see the section updateable Policy Preferences) or the Access Controller (see the section Access Controller Preferences). The only difference is that you also can specify the name of the serializer.
Please see PStore Service for information about the underlying management Web services.
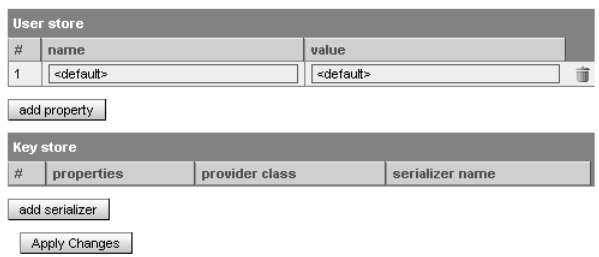
The form is in two sections, one for User Store and one for Key Store.
User Store holds the following information about each user property:
Name
Name of the property.
Value
Value of the property.
To remove a property, click the Remove property
 icon.
icon.
To add a new property, click the Apply Changes button.
Key Store holds the following information about each serializer:
Serializer Name
Name of the serializer.
Provider class
Name of the class which implements the serializer.
Properties
A table with the Name and Value of the serializer properties. You can Add serializer property or Remove serializer property by clicking on the appropriate button.
To add a new serializer, click the Add Serializer button.
To apply the changes, click the Apply button.
updateable Policy Preferences Locate
The updateable Policy form allows the user to adjust configuration of the updateable Policy (please see Authorization Model in WSO2 SOA Enablement Server in the Secure Messaging chapter of Web services Security).
The panel contains a table listing updateable Policy properties by name and value. Take care when changing these manually. You can also click on the relevant buttons to Remove property or Add property.
The field Provider Class Name contains the name of the class which implements updateable Policy.
To apply the changes, simply press the Apply Changes button.
WS-SecurityPreferences Locate
Use this form to set the default, global configuration of WS-Security Provider. These preferences are followed in cases where they are not overruled in the runtime or persistent configuration on the call context, service instance or service endpoint, as explained in the Low-level Configuration section of the WS-Security Provider chapter.
This global configuration follows the low-level API given in org.systinet.wasp.security.ws.conf.WSSEGlobalConf.
Transport Preferences Locate
The Transport Settings tree node contains a subnode for every possible WSO2 SOA Enablement Server transport. These transports are:
Simple Clients Locate
![[Important]](images/important.gif) | Important |
|---|---|
File Client, Jar Client, JDK Client, POP Client and SMTP are all simple clients. To set them up, your only options are changing the default time-out and pre-loading the transport, if you wish. | |
HTTP Client Transport Locate
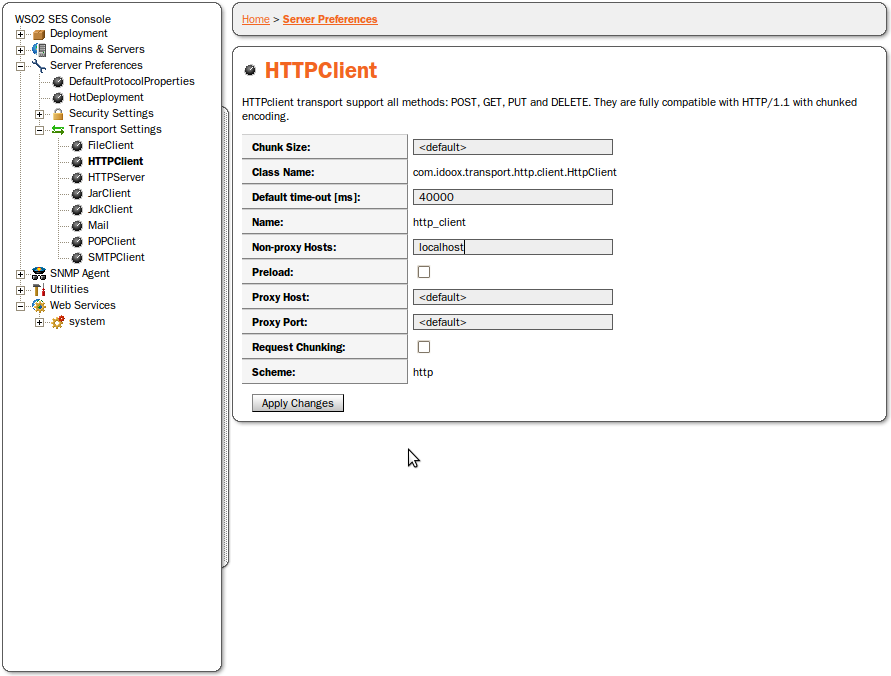
On the HTTP Client Transport panel you have the following options (as shown in Figure 43):
ChunkSize - size of chunks in chunked encoding.
Default time-out - default time-out for connections, in milliseconds (0 means infinite time-out).
Non-proxy Hosts - comma-separated list of host names for which proxy server is not used.
Preload - check to preload transport.
Proxy Host - host name of the proxy server
Proxy Port - port of the proxy server (for example, 3128)
Request Chunking - check to have chunked encoding.
Press the Apply Changes button below to save any changes.
HTTPS Client Transport Locate
You have the same properties to set for HTTPS Client Transport as you have for HTTP Client Transport. There is one additional property, Check Server Certificate. Check this box to require that the server certificate domain name match the requested address.
HTTP Server Transport Locate
When setting HTTP Server Transport preferences you have the following options (shown in Figure 44):
Context Path - Prefix for WSO2 SOA Enablement Server endpoint path. Read-only.
Default Server - Check if you want to set this transport as the default. Only necessary for Runtime use of the WSO2 SOA Enablement Server transport.
Host Name - Only necessary for Runtime use of the WSO2 SOA Enablement Server transport.
Max Idle Time - The longest time, in milliseconds, that the connection can idle.
Maximum Read Time - The longest time, in milliseconds, that the connection can block.
Maximum Threads - The maximum number of waiting threads for new incoming connections.
Minimum Threads - The minimum number of waiting threads for new incoming connections.
Port - The port where the server accepts requests.
Preload - Check to preload HTTP Server.
To commit any changes, click the Apply button located below the panel.

HTTPS Server Transport Locate
You have the same properties to set for HTTPS Server Transport as you have for HTTP Server Transport, with the addition of the following:
Alias - Used for creating HTTPS server identity.
Needs client authentication and Password - Check box for server to require client authentication. Click on the Password button to set password.
To commit any changes, click the Apply button located below the panel.
Mail Transport Locate
The Mail Transport sub-panel performs many of the same functions as the MailSetupTool. It has the following fields to be set:
Default Server - Check if you want this transport as default. Only necessary for Runtime use of WSO2 SOA Enablement Server transport.
Input: Password - Press to set an input server access password.
Input: Server - Input server (pop3); for example, pop://wasp.company.com.
Input: Sleep Interval - Interval in milliseconds between downloading messages from server.
Output: From - Value for from field when Mail is sending output, such as wasp@company.com.
Output: Server - Output server (SMTP), such as smtp://smtp.company.com.
Preload - Check to preload Mail Transport.
JMS Transport Locate
See JMS Transport for basic information about JMS Transport in WSO2 SOA Enablement Server.
Clicking the JMS tree node in Server Preferences Transport Settings loads the JMS Transport panel, shown in Figure 45 and Figure 46. Set the basic JMS configuration in the top of the panel:
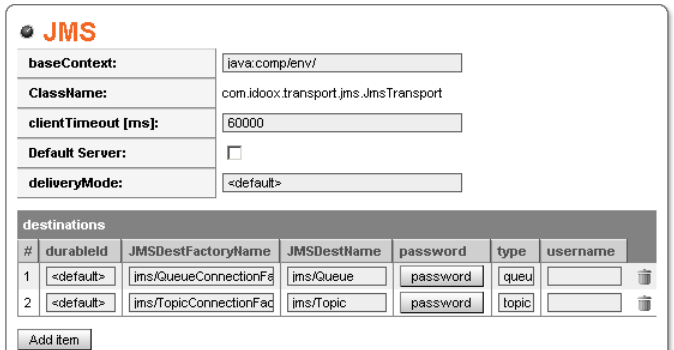
Base Context - for details, please read JMS Transport.
Client time-out - Client time-out in milliseconds.
Default Server - Check box if you want JMS as the default transport.
Delivery Mode - Specifies delivery mode of messages sent. Can be persistent or non-persistent.
Destinations box - Attributes of current destinations.
durableID - is used with durable topic subscription. The attribute specifies the id for the destination configured by the attributes jmsDestinationName and jmsDestinationFactoryName.
jmsDestinationName - name of connection factory,
jmsDestinationFactoryName - name of the queue or topic (see "type")
password and username - these two specify credentials to be used when accessing JMS connections.
type - values are "queue" (Point to Point communication) or "topic" (Publish/Subscribe communication).
Trashcan icon - Press this button to delete the destination.
The bottom part of the panel is for adding new destinations.
durableID, jmsDestinationFactoryName, jmsDestinationName - Attributes for durable topic subscription.
Message Expiration - time-out for JMS Messages.
Message Priority - Priority for JMS messages (0-9).
Password button - Click here to set a password for the destination.
Preload - Check this box to preload JMS transport.
Reductions box - See below.
Server ID - Server selector value.
type - Values are "queue" (Point to Point communication) or "topic" (Publish/Subscribe communication).
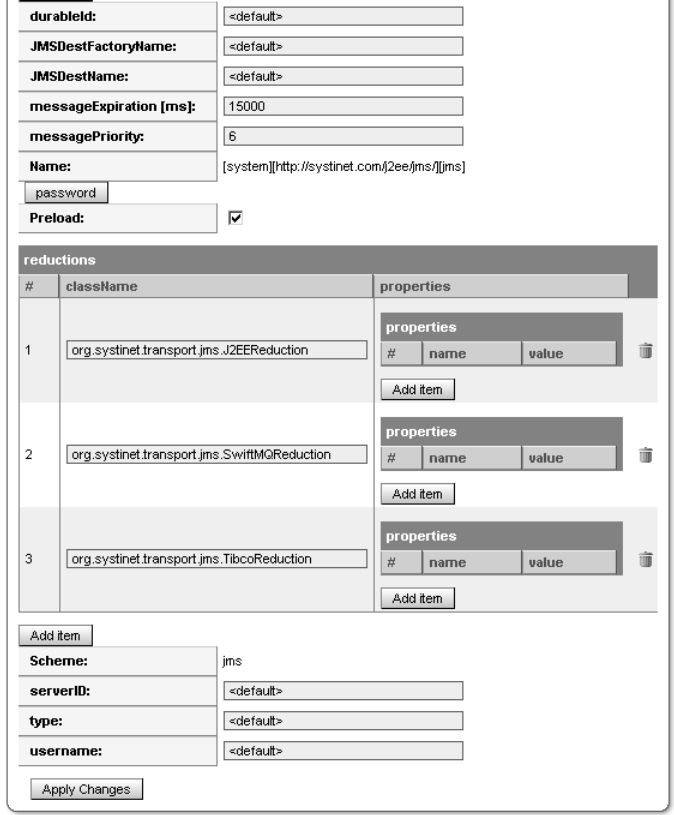
To save these changes, press the Apply Changes button at the very bottom. Further descriptions of JMS transport parameters can be found in JMS Transport in the Raw Level Processing sub-book, Message Processing, Developer's Guide.
Reductions - These are proprietary APIs that have been reduced to an accessible form while preserving their customization functions. Properties can be added to or deleted from these reductions. The reductions themselves can be deleted. Please see Resolving JMS Administered Objects in the JMS Transport chapter, Raw-Level Processing, Message Processing, Developers' Guide.
Custom Transport Locate
You can plug in your own transport protocol in WSO2 SOA Enablement Server, as detailed in the Custom Transports chapter. This transport can also be configured in the Administration Console, like a built-in transport. To do this you have to create a new node for it in the Server Preferences form. This is described in the Configuring a Custom Transport with the Admin Console section of Custom Transports.