Server Security Management Locate
Overview Locate
Identities and certificates are stored in the User Store and Key Store, respectively. These can be managed from the WSO2 SOA Enablement Server for Java Administration Console.
You can load the Database of Identities form from either the Security tree node or the Database of Identities subnode of the Administration Console. All security management functions are accessible from there.
![[Note]](images/note.gif) | Note |
|---|---|
The Security panel of the Administration Console is installed only if WSO2 SOA Enablement Server for Java has been installed with security. | |
| Note |
|---|---|
The server security functionality of the Administration Console is duplicated in the PStore tool, which has a GUI version. The PStoreTool is somewhat more powerful and can be used for managing client as well as server security, but cannot be used remotely. | |
Database of Identities (User Store) Locate
Add and delete users and edit their properties, permissions and roles from the Database of Identities.
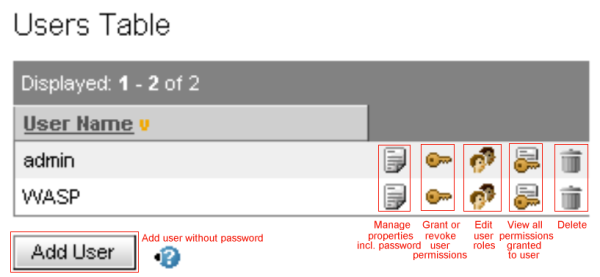
The Security tree node or Database of Identities subnode of the Administration Console loads the Database of Identities form. It includes the Users Table in the lower part of the form. You can delete users directly from this table. It also has links to forms for viewing or editing permissions and editing roles and properties. Beneath the table is a button for adding a user (see Figure 37).
Adding and Deleting Users Locate
To add a user to the User Store:
Click on the Security tree node or Database of Identities subnode of the Administration Console. This loads the Database of Identities form.
Click on the Add User button in the lower left corner, beneath the Users Table (see Figure 37). This loads the Add User form.
Enter the name of the user you wish to add and click either Add User or Cancel.
![[Caution]](images/caution.gif) | Caution |
|---|---|
You have just added a user without a password. See Adding and Editing User Properties for how to assign a password to a user. Users are able to change their own passwords. | |
| Note |
|---|---|
There is a detailed example of a user being created and given a password in the section Adding a User. | |
To delete a user from the User Store, click on Delete in the rightmost column on the Users Table (see Figure 37.) You will be asked to confirm that you truly wish to delete that user.
Adding and Editing User Properties Locate
Each user listed in the User Store has a group of properties used for identification. These properties are:
Password
X.509 Certificate
X.509 Certificate Chain
Follow these steps to add and edit the properties:
Adding a Property Locate
If you are not in the Database of Identities form, load it by clicking on the Security tree node or the Database of Identities subnode of the Administration Console.
Click on Properties in the user's row in the Users Table. This loads the User Detail form.
Click on the Add Property button at the bottom of the User Detail form. This loads the Add Property form.
The Add Property form contains a table listing the possible properties to add. These are password, X.509 Certificate and X.509 Certificate Chain. Clicking on Select for one of these loads the User Property form.
The User Property form contains the relevant input fields for the property you are adding. For adding a password, this is simply the password. For an X.509 Certificate or Certificate Chain, it is the location of the certificate file.
Editing a Property Locate
If you are not in the Database of Identities form, load it by clicking on the Security tree node or Database of Identities subnode of the Administration Console.
Click on Properties in the user's row in the Users Table (see Figure 37). This loads the User Detail form.
The User Detail form contains the Properties Table. You can choose to see more Detail for a property, Edit the property or Delete it. Clicking Edit loads the User Property form.
The User Property form contains the relevant input fields for the property you are editing. For editing a password, this is simply the new password. For an X.509 Certificate or Certificate Chain, it is the location of the new certificate file.
Permissions Locate
To access sensitive resources on the server, the user must be granted permission. This section covers the basics of granting and revoking permissions. Permissions can be controlled with finer granularity through Web Service Security Management.
For more information about permissions, please see The Authorization Model in WSO2 SOA Enablement Server.
A list of all permissions is given in Permissions and Roles.
| Note |
|---|---|
Users granted the Administrator role automatically have all permissions through the java.security.AllPermission permission. | |
Management Permissions Locate
| Permission | Description |
|---|---|
| Deploy | Lets a user deploy packages onto the WSO2 SOA Enablement Server. |
| Get Packages | A user with this permission can get information about any packages that are deployed. |
| Get Services Info | Allows a user to get information about any services which are deployed. |
| Manage Service Instances Properties | This permission allows the user to manage any deployed service instances, such as controlling polymorphism support. |
| Service Instances State Management | Allows a user to change the state of any service instance. |
| Monitor Service Endpoints | Lets a user monitor service endpoints. |
| Manage Service Endpoints | Allows a user to manage service endpoints. For example, a user with this permission can control a service endpoint's interceptors. |
| Manage ACLs | Allows a user to grant and revoke permissions and roles. |
For information about the APIs of these permissions, please see org.systinet.security.perm.
Follow these steps to grant or revoke a management permission:
If your browser is not displaying the Database of Identities form, load it by clicking on the Security tree node or Database of Identities subnode of the Administration Console.
Click on Permissions in the user's row in the Users Table. This loads the Permissions form.
The lower section of the Permissions form lists the permissions and their statuses. If the status is Revoked or Granted, clicking on the status changes it. For example, clicking on Revoked changes that permission's status to Granted.
Permissions for Identities and Roles Locate
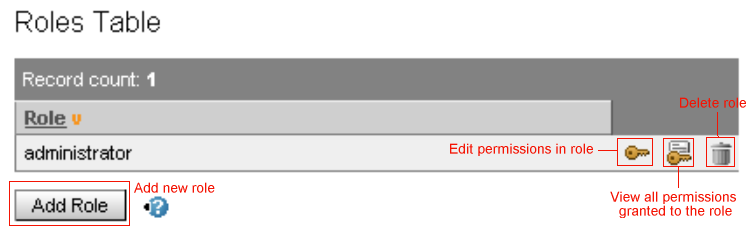
To see all the permissions granted a user, either click on Permissions Overview in the Users Table (as shown in Figure 37) or click on the Permissions Overview button on the Permissions form. Follow the Permissions Overview link on the Roles form to see all the permissions within a role (as shown in Figure 40). Clicking on any of these loads the Permissions Overview form, in which you can delete or edit permissions and add custom permissions.
Editing permissions
Click on Edit for a permission in the table in the Permissions Overview form. This loads the Edit Permission form. You can change the type of permission (usually a class name), the ID of the object to which the permission belongs, and the actions permitted to the object.
Deleting permissions
Click on Delete for a permission in the table in the Permissions Overview form. Alternately, click on the Remove Permission button in the Edit Permission form.
Adding custom permissions
Click on the Add Custom Permission button in the Permissions Overview form. This loads the Add Permission form. Use this form to specify the type of permission (usually a class name), the ID of the object to which the permission belongs, and the actions permitted to the object.
Granting Roles Locate
A role is a set of permissions identified by a unique name. WSO2 SOA Enablement Server manages roles dynamically. That is, it can create/delete roles and manage their permissions at runtime. When a particular role is assigned to a user, he is granted all permissions associated with that role.
Follow these steps to grant or revoke a role:
Click on the Roles subnode of the Security tree node of the Administration Console. This loads the Roles form.
The Assign Roles form contains a table listing all roles that a user may have assigned. Click grant or revoke in the role's row to change the user's permissions accordingly.
For information on creating a role or adding/deleting permissions to a role, please see Creating and Editing Roles.
KeyStore Certificates Locate
The Key Store is a database of all private key/certificate (or certificate chain) pairs. The key/certificate pairs are called Key Entries. They are indexed by special names called aliases.
The following functionality is associated with managing Key Entries and trusted certificates:
All this functionality is accessed through the Key Stores form. Follow these steps to load the form:
If you are not in the Security panel, click on the Security tree node or Database of Identities subnode of the Administration Console. This loads the Database of Identities form of the Security panel.
Click on the Key Store subnode of the Security tree node in the upper left of the Database of Identities form. This loads the Key Store form.
Adding and Deleting Key Entries Locate
To add a new key entry, follow these steps:
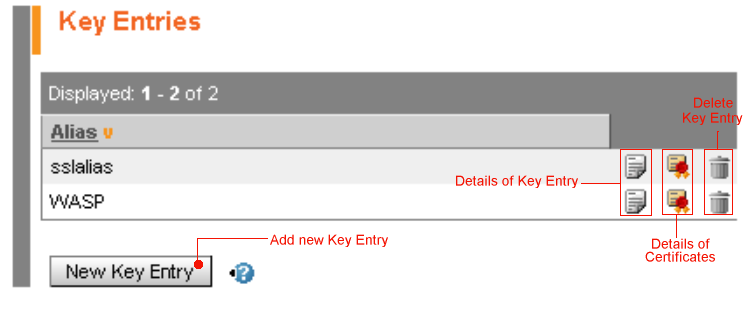
Click the New Key Entry button beneath the Key Entries table in the Key Store form (as shown in Figure 38). This loads the New Key Entry form.
Enter the alias and password of the new Key Entry. You may also enter its Distinguished Name, a set of attribute values that identify the path leading from the base of the directory information tree to the object that is named.
Click the Generate button when finished.
To delete a key entry, click on Delete in the Key Entries table in the Key Store form (as shown in Figure 38). You will be asked to confirm.
Viewing Details of Key Entries, Certificates, and Certificate Chains Locate
To view the details of a Key Entry:
Click on Key Entry in the Key Entries table (see Figure 38) for the Key Entry whose details you wish to examine. This returns the Key Password form.
On the Key Password form, type the password for the alias of the Key Entry. The default password is "changeit." Entering the correct password loads the Key Detail form.
To view details of the certificate or certificate chain associated with a Key Entry, click on Certificates for that Key Entry in the Key Entries table (as shown in Figure 38).
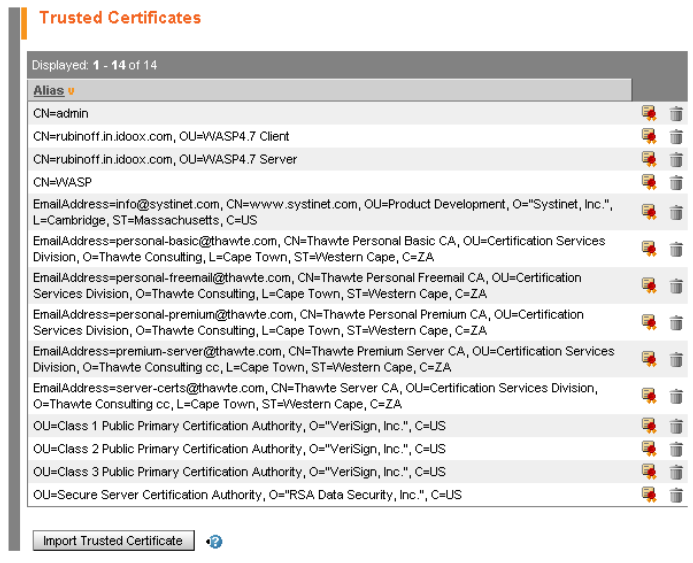
Alternatively, you may look up the certificate in the Trusted Certificates table (below the Key Entries table), and click on Certificates for the certificate you wish to view (as shown in Figure 39).
Either way, the Certificates form is loaded, showing further details of the certificate.
Importing a Certificate into a WSO2 SOA Enablement Server Locate
There are two scenarios for importing a certificate into a WSO2 SOA Enablement Server:
Importing a trusted certificate:
Click on the Import Trusted Certificate button below the Trusted Certificates table in the Key Store form. This loads the Import Trusted Certificate form.
Enter the file location of the certificate in this form. You may Browse for it.
Click Continue when done or Back to cancel.
Importing a certificate into the certificate chain of a particular Key Entry:
Click on KeyEntry in the Key Entries table (as shown in Figure 38) for the Key Entry to which you wish to add the imported certificate. This loads the Key Password form.
On the Key Password form, enter the password for the alias of the Key Entry. The default password is changeit. Entering the correct password loads the Key Detail form.
Click on the Import Certificate button. This loads the Import Certificate form.
Enter the file location of the certificate in this form. You may Browse for it.
Click Import Certificate when done or Cancel.
Exporting a certificate or certificate chain to a file Locate
Use one of three ways to access the certificate exporting functionality:
Click on Certificates in the Key Entries table (as shown in Figure 38) for the Key Entry whose certificate or certificates you wish to save on disk. This loads the Certificates form.
Alternatively, you can access the same functions from the Key Detail form as shown in Viewing details of a key entry, certificate, or certificate chain.
You may also click on Certificates for a specific certificate in the Trusted Certificates table (as shown in Figure 39).
Click on Export Certificate for individual certificates or the Export Certificate Chain button for all the certificates in the table. In either case you will be asked whether you wish to open or save the certificate files. If you choose to save the files, you will be asked to specify the destination.
Creating and Editing Roles Locate
A role is a set of permissions identified by a unique name. WSO2 SOA Enablement Server manages roles dynamically, that is, it can create/delete roles and manage their permissions at runtime. A particular role can be assigned to a user who is granted all permissions associated with that role.
![[Important]](images/important.gif) | Important |
|---|---|
You must have permission to manage ACLs in order to create and edit roles. Normally only the Administrator role has this permission. | |
Roles are created and edited through the Roles form. To load this form, click on the Roles subnode of the Security tree node of the Administration Console. This loads the Roles form.
Editing Roles Locate
Permissions are added to roles in the same way they are granted to users. For more information, please see Permissions.
Note that when adding permissions to a role, you use the Roles Table in the Roles form (as shown in Figure 40) rather than the Users Table in the Database of Identities form (shown in Figure 37 for comparison).
For more information on granting roles to users, please see Granting and Revoking Roles.
Creating Roles Locate
Click the Add Role button below the Roles Table as shown in Figure 40. This loads the Add Role form.
Enter the name of the role you wish to create and click this Add Role button. This reloads the Roles form.
Add permissions to the new role as discussed in Editing Roles.