Wizard Installation Locate
Before you begin installation of WSO2 SOA Enablement Server for Java, determine the type of installation you require: Server, Client or Custom. Installation scenarios are discussed in the Installation Overview.
Starting Installation Locate
Windows users may launch the installation wizard by double-clicking the distribution file, wso2-soa-enablement-server-java-6.6.jar. (Note that the .jar extension must be associated.)
If you are installing WSO2 SOA Enablement Server for Java on a UNIX platform, type:
# java -jar wso2-soa-enablement-server-java-6.6.jar
Please note that if your JRE has been installed in a directory other than JDK/lib, you must specify the jdk.home property.
![[Important]](images/important.gif) | Important |
|---|---|
For UNIX users: Be sure that the /bin directory (or a directory where the chmod utility is located) is set in PATH before installation. If not, set it with the command export PATH=$PATH:/bin Also be certain that JAVA_HOME and the PATH to $JAVA_HOME/bin have been set. | |
![[Caution]](images/caution.gif) | Caution |
|---|---|
The command java -jar wso2-soa-enablement-server-java-6.6.jar does not work on some encodings. If you have any problems starting the installer, try running java -classpath wso2-soa-enablement-server-java-6.6.jar Install instead. | |
Installation Steps Locate
The wizard starts with a Welcome page. You can unpack the documentation from here. Click Next to continue.
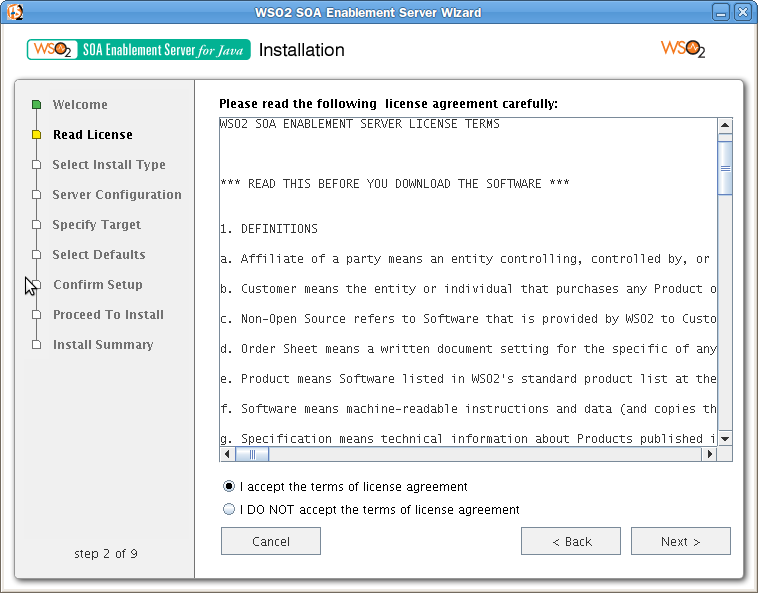
To continue with the installation of WSO2 SOA Enablement Server, you must agree to the license agreement. To do so, select I accept the terms of the license agreement and click Next.
If you do not agree to the terms of the license agreement, select the radio button labeled I DO NOT accept the terms of the license agreement and click Next.
Important If you choose not to accept the terms of the agreement, your installation will be discontinued.
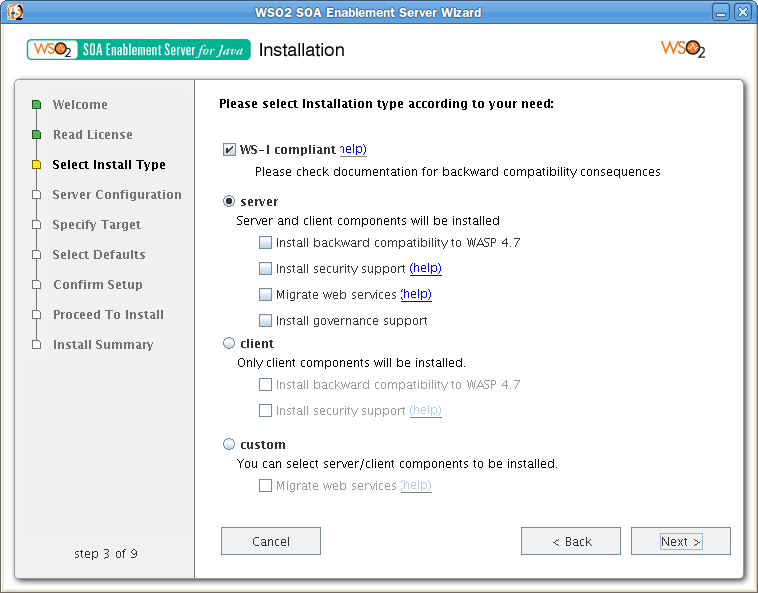
Select Install Type – The wizard lets you choose from the following installation types:
Server Choose this to install the basic components of the WSO2 SOA Enablement Server server and client sides.
Client Choose Client to install the client side of the WSO2 SOA Enablement Server. If choosing one of these options, see Standard Installation.
Custom This choice allows you to select individual WSO2 SOA Enablement Server components to install. If choosing this option, see Custom Installation.
Standard Installation Locate
If you are making a standard server or client installation of WSO2 SOA Enablement Server, determine if you are installing with or without backward compatibility or security support. Also determine whether you want WS-I compliance to be enforced as default. Note that there may be backward compliance issues. (See WS-I Compliance for details.)
Check the box labeled Install backward compatibility if you would like your installation of WSO2 SOA Enablement Server 6.5.4 to be compatible with a previous installation. WSO2 SOA Enablement Server for Java 6.5.2 is only backward compatible with versions 6.5.2, 6.5.1, 6.5, 6.0 and 5.5. For more information, see Backward Compatibility
Check the box labeled install security support if you are planning to develop real-world Web services with this installation of WSO2 SOA Enablement Server. If installing without security support, skip to the Installation Summary.
Important Choosing to configure without security support is recommended for evaluation purposes only.
Check the box labeled Migrate Web services if you need to migrate services from version 4.x or 5.x of WSO2 SOA Enablement Server for Java.
Security Check – The installation wizard displays the message "The security support installation has been selected – we need to check that necessary classes and security algorithms are available." If this check is successful, as indicated by the phrase "Security support OK," click Next.
Server Domain This screen appears only during Secure and Custom Installations. It allows you to change the persistently stored hostname from the default. The default domain name will appear on screen.
This option is included because the installation process puts the IP address into configuration files and server certificates. If the server has several DNS names this allows you to choose which one will be used.
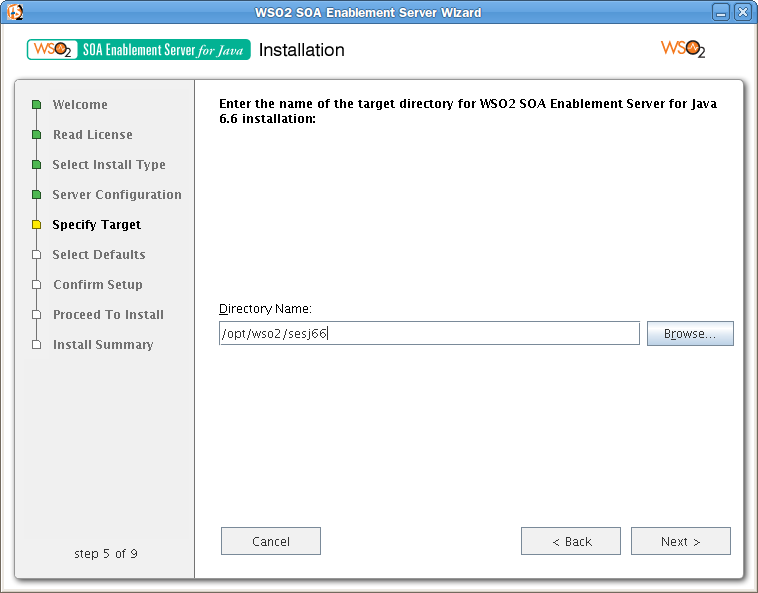
Specify Target Type or browse for the directory in which the software will be installed and click Next.
The default location is the folder in which the wso2-soa-enablement-server-java-6.6.jar file is located.
Create icons If you are installing on a Windows platform, you may choose to install desktop icons and/or start menu icons on the next screen.
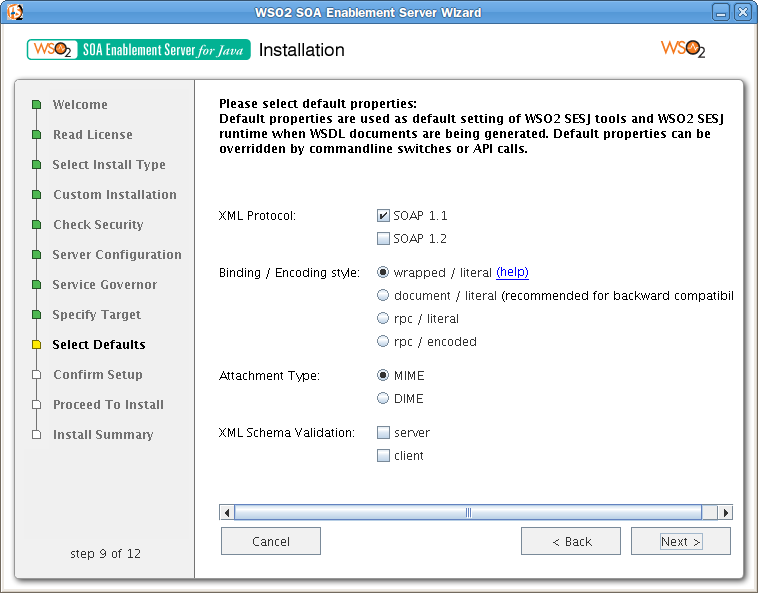
Select defaults On the Select defaults screen, choose the default properties for XML protocol, SOAP binding style, SOAP encoding style, and attachment type as explained below.
XML Protocol Choose SOAP 1.1 to enable only the established SOAP 1.1 XML protocol. Choose SOAP 1.2 XML protocol to enable only the SOAP 1.2 XML protocol. Choose both to enable both the SOAP 1.1 and SOAP 1.2 XML protocols.
SOAP Binding and Encoding Style Within a WSDL document, the binding describes how the service is bound to the SOAP messaging protocol. The WSDL SOAP binding can be either RPC style or document style. In addition, the binding can have an encoded use or a literal use. This leads to four possible binding styles, three of which are supported by WSO2 SOA Enablement Server. There is also a special type of document/literal binding that is "wrapped." The default binding is wrapped "document/literal." Please see SOAP Binding and Encoding Styles for an explanation of binding styles.
Caution The "wrapped" document/literal binding style is WS-I compatible but it may create problems with backward compatibility.
Attachment Type Choose MIME or DIME as the default attachment type for your SOAP messages according to your needs. Default choice is "MIME." Below are very short descriptions of each attachment type.
MIME (Multipurpose Internet Mail Extensions) uses a number of data records which contain the data to be sent. Each of these records has a header and a payload. MIME uses a separator string to indicate where the current payload ends and the next payload begins. The separator string is located at the beginning of a MIME message and in between each data record. When parsing the data, the parser scans each data record until it locates the separator string. This string indicates the beginning of next data record.
DIME (Direct Internet Message Encapsulation) also uses data records with headers. However, with DIME each header contains the length of the payload, rather then a separator string. Therefore instead of using a separator string to delineate records, the record size is used. Using this method, parsing the payload is much simpler. Because the size of each record is known, moving from record to record is much quicker, as there is no need to scan every record. However, MIME remains significantly more widely supported.
XML Schema Validation By checking XML Schema validation server, you enable validation on the server side of SOAP messages according to the XML schema. By checking client SOAP messages will be validated on client. Note that enabling XML schema validation may significantly reduce performance in cases where validation is not really necessary. See Message Validation for more details.
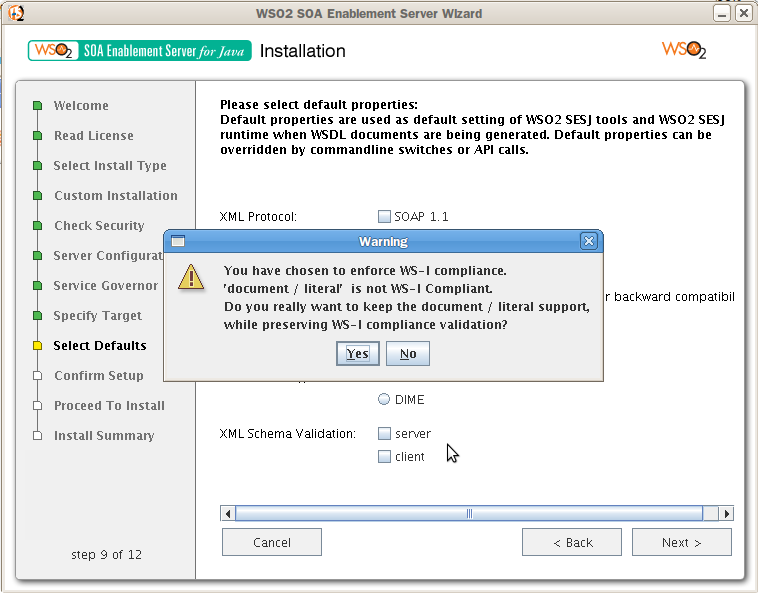
If you chose a WS-I compliant installation, the default options will be set to be WS-I compliant. Changing an option may cause a loss of WS-I compliance. If you choose a WS-I non-compliant option, a warning will appear, as in Figure 6.
![[Note]](images/note.gif)
Note In a server installation, the default settings can be changed after installation, through the Administration Console GUI. Please see Default Protocol Properties.
Default settings can also be changed manually for all installation types, in the conf/serverconf.xml and conf/clientconf.xml configuration files. These settings are in the <preferences name="main"> element. Options for changing defaults are explained in the code comments therein.
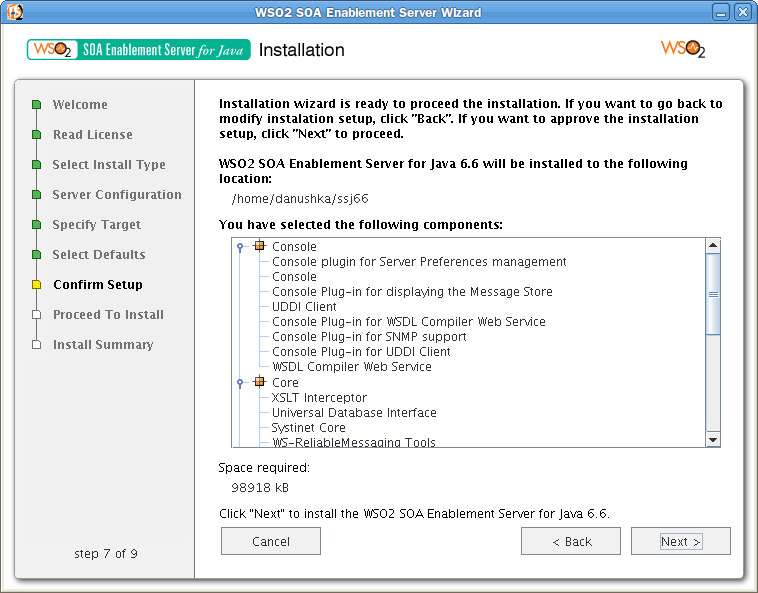
Confirm Setup Review the displayed list of components carefully. If you agree with the information in the summary, click Next to begin copying files. If not, click Back in order to make changes to the data you have provided.
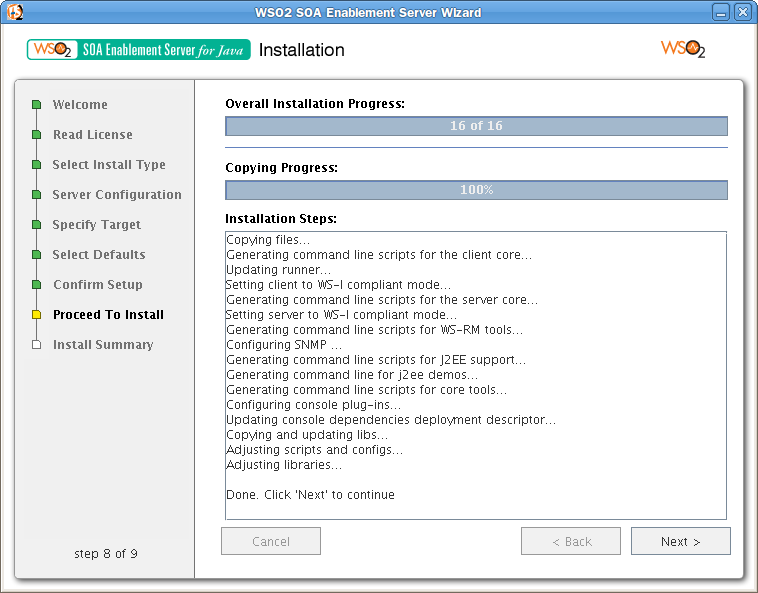
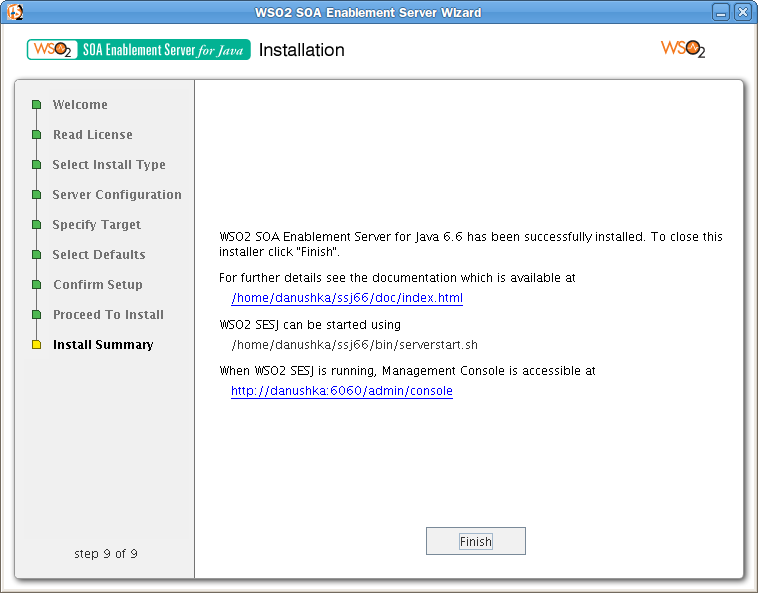
Proceed Install The steps of the installation are displayed as they are executed, as in the Installation Summary window of the Installation Wizard. Click Cancel Installation at any time to stop the installation. When the installation is complete, click Finish.
Custom Installation and Adding Components Locate
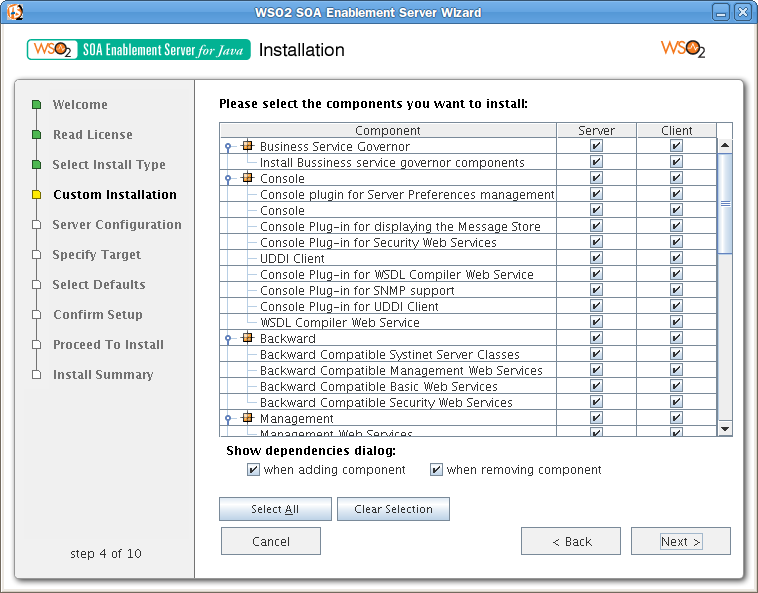
Custom Installation Select the individual client and server components you wish to install. (Please see Components for details.)
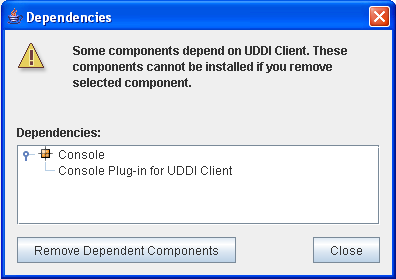
Any dependencies that are broken when excluding a component are shown in a pop-up screen, as in Figure 9.
Security Support If you have chosen to install security support components, the installation wizard returns the message "The security support installation has been selected – we need to check that necessary classes and security algorithms are available."
If this check is successful, as indicated by the phrase "Security support OK," click Next.
Specify Target Type or browse for the directory in which the software will be installed and click Next.
The default location is the folder in which the wso2-soa-enablement-server-java-6.6.jar file is located.
Confirm Setup Review the displayed list of components carefully. If you agree with the information in the summary, click Next to begin copying files. If not, click Back in order to make changes to the data you have provided.
Proceed Install The steps of the installation are shown in this window. Click Cancel Installation at any time to discontinue the installation. When the installation is complete, click Finish.