Raw Level Processing Locate
Raw Level Overview Locate
The lowest layer of WSO2 SOA Enablement Server architecture, called the raw level, includes transports and interceptors.
Transports carry messages between a client and a remote object. Each transport sends and receives messages as a series of bytes. Message metadata (headers) describe the data in each message. Being at the lowest level, transports are normally hidden under service interfaces. You do not normally need to worry about transports when implementing a service.
On the client side, a transport is chosen during lookup when the user chooses the URL of the WSDL file being looked up. This transport is chosen simply by setting the name (scheme) of the transport at the beginning of the URL. For more information about URLs during lookup, see Transport Use Cases.
WSO2 SOA Enablement Server includes a large number of built-in transports. WSO2 SOA Enablement Server is set up so that the JMS Transport can be plugged in easily. Other transport mechanisms can be plugged in through modifying the WSO2 SOA Enablement Server configuration; see the Custom Transports chapter.
The process of communicating a message with a transport can be customized by using interceptors. Interceptors accept a raw transport message as input. They modify it and return a transport message as output. This level has no notion of XML or higher level protocols, so it is able to do such things as converting non-XML protocols into XML protocols and vice-versa.
Transport Use Cases Locate
Transports are normally hidden from the user. However, there are four sets of use cases when a user will need to deal directly with transports:
URL of WSDL file
URL of Web service
Cases where Transport API must be used
Implementing a raw service
Invoking Web service on raw level
Interceptors
URLs During Lookup Locate
URL of WSDL File Locate
On the client side, a transport is chosen during lookup when the user chooses the URL of the WSDL file being looked up. This transport is chosen simply by setting the name (scheme) of the transport at the beginning of the URL.
URL of Web Service Locate
This is usually taken from the WSDL file. However, when using mail transport and in other special cases, you need to overwrite this URL by using methods on ServiceClient (see Client Settings).
Transport Methods Locate
Each transport implementation specifies the transport methods it supports. When performing lookup, you need to use a transport that supports the GET method. (Mail transport, for example, does not support GET). Also, when communicating on the raw level, you must select the transport method to use, depending on the type of communication. SOAP uses POST method for message transfer; GET is used for WSDL retrieval. Furthermore, when implementing a raw service, the implementation method differs according to whether a GET or POST method is being processed.
All transport methods are defined in the org.idoox.transport.TransportMethod class:
Either sends and receives or only sends data to an existing resource with given URI. The connection contains an output message and an input message or null value from a client point of view. If the input message is null, the transport supports only one-way messages.
Retrieves data from an existing resource with given URI. The connection contains an input message only from the client point of view.
For more on POST and GET, see the Zvon RFC Repository.
Transport API Locate
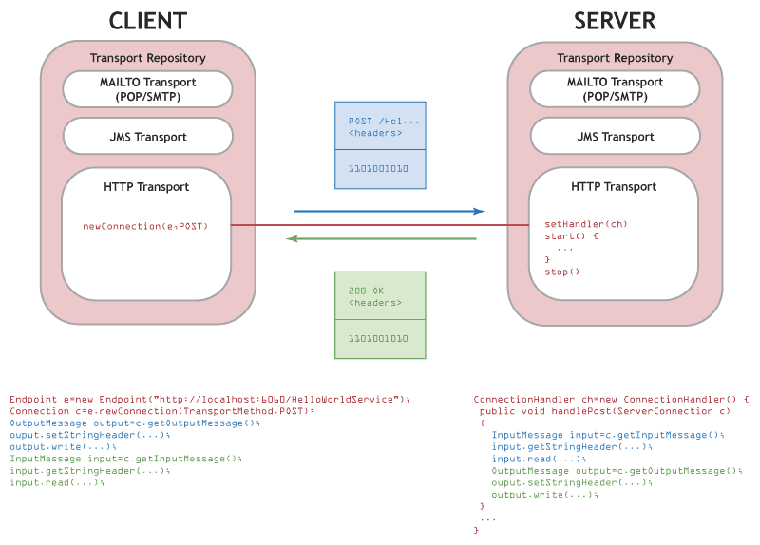
When implementing a raw service, invoking on the raw level or using a transport interceptor, the transport connection must be set up by the Transport API.
The transport connection is a holder for input and output messages; messages can be set and got on each connection. When a client makes a new Connection, he must specify if it is for POST or GET. When processing a connection on the server side, you can retrieve if it is POST or GET.
The most important elements of the API for the user are org.idoox.transport.client.Endpoint, org.idoox.transport.InputMessage and org.idoox.transport.OutputMessage.
Endpoint(URL) is used to create new client connections to a given URL manually at the raw level.
InputMessage contains receiving headers and the input stream. It is used in all three use cases.
OutputMessage contains sending headers and the output stream. It is also used in all three use cases.
See Figure 12 for a diagram of the API in action. Also note these other features of the API:
The transport can create both ClientConnection and ServerConnection according to the transport type ( org.idoox.transport.Transport and org.idoox.transport.Transport). Client transport creates new connections in the newConnection(URI uri, TransportMethod method, java.util.Map properties) method.
Server transport starts, stops and creates new connections in its own thread. These incoming-server connections are passed to org.idoox.transport.server.ConnectionHandler when this is set on the transport with the Transport.setHandler(ConnectionHandler handler) method or on the whole transport repository with the TransportRepository.setHandler(ConnectionHandler handler) method. See also Starting Server Transports.
The connection is bound to a resource identified by a URI. The URI looks like:
<scheme>://<userinfo>@<host>:<port><context_path><path>?<query>#<fragment>
Only the scheme is required; it names the transport used for the given URI. The server transport can also create the absolute path (endpoint) from the local path and vice versa.
When publishing a Web service with Registry.publish(RELATIVE_PATH), you can retrieve the absolute path, or endpoint, for the service for a specific transport with Wasp.getAbsolutePath(RELATIVE_PATH). For example, given the relative path "/HelloWorld" for the HTTP Transport:
Registry.publish("/HelloWorld", new HelloWorldService());

String endpoint = wasp.getAbsolutePath("http", "/HelloWorld");
This endpoint can be used to reach the service as a remote object:
Registry.lookup(endpoint + "/wsdl", HelloWorldService.class);
Configuring and Starting New Transports on the Server Locate
In some situations you need to start new transports on the server. For example, you may need more http servers on different ports, or different IP addresses. Do this through transport deployment using a deployment descriptor or runtime API.
When using a deployment descriptor, use the <transport> element, optionally together with the <configuration> element.
Runtime API uses the org.systinet.wasp.Wasp class to start a new transport. There are two methods for this purpose: startServer(String endpoint) and Transport startServer(String scheme, Configurable configuration). The first uses the default configuration for the given scheme and the second enables you to specify your own configuration, which is then merged with the default configuration for the given scheme.
Built-In Transports Locate
Overview Locate
WSO2 SOA Enablement Server contains a number of simple built-in transports. Each is configured in the files WASP_HOME/lib/serverconf.xml and clientconf.xml. For server installations of WSO2 SOA Enablement Server for Java, transports can be chosen and configured in the Administration Console. See Server Preferences Management for instructions. For other installations, the configuration elements can be amended manually.
![[Note]](images/note.gif) | Note |
|---|---|
JMS Transport is not configured in serverconf.xml or clientconf.xml. It is described in JMS Transport. | |
Transport Configuration Locate
Within WASP_HOME/conf/serverconf.xml and clientconf.xml, all transports are configured in transport elements except HTTPS (please see HTTPS). All transport elements include the following attributes:
Table 4. Configuration Parameters of All Transports
| Attribute | Description |
|---|---|
| name | Name of the transport |
| scheme | Transport scheme, such as http, ftp, etc. |
| preload | Boolean indicating whether the transport must be preloaded and started when the repository is initialized |
| class | Transport implementation class |
| classSpace | Where the implementation is instantiated |
Components Containing Transports Locate
The functionality of WSO2 SOA Enablement Server is spread over a number of components. (See WSO2 SOA Enablement Server Components) For WSO2 SOA Enablement Server to support a particular transport, the component containing that transport has to be included in your installation. A list of transports and components follows:
| Component | Transport |
| Core | HTTP, File, JAR, JDK, Servlet, Mail |
| Security-Providers | HTTPS |
| J2EE-JMS-Transport | JMS Transport |
HTTP Locate
HTTP client and server transports support all methods: POST, GET, PUT and DELETE. They are fully compatible with HTTP/1.1 with chunked encoding.
HTTP transport for WSO2 SOA Enablement Server for Java is located in the following classes:
com.idoox.transport.http.Http
HTTP transport layer class referring to the client and server classes below:
com.idoox.transport.http.client.HttpClient
HTTP client-side. You only need this class for HTTP Client.
com.idoox.transport.http.server.Jetty
HTTP server
The HTTP URI looks like:
http://<userinfo>@<host>:<port><path>?<query>#<fragment>
An HTTP client has the following configuration parameters, as attributes of the element <transport ... name="http_client'>:
Table 5. Configuration Parameters of HTTP Client
| Parameter | Description | ||||
|---|---|---|---|---|---|
| defaulttime-out | Default time-out in milliseconds for a connection (default value: infinite time-out) | ||||
| requestChunking | Requests will be chunked? (default: false)
| ||||
| chunkSize | Size of request chunks if they are enabled with the requestChunking parameter (default: 0x4000) | ||||
| proxyHost | Host name for the proxy server | ||||
| proxyPort | Port of the proxy server | ||||
| nonProxyHosts | comma-separated list of non-proxy hosts | ||||
A server has the following configuration parameters:
Table 6. Configuration Parameters of HTTP Server
| Parameter | Description |
|---|---|
| defaultServer | Boolean value indicating if the transport is the default one for the specified scheme |
| hostName | The host name of the network interface where the started transport is bound, such as 'localhost' or 'www.in.company.com'. If this parameter is empty, the HTTP server will be bound to all local interfaces, usually to 'localhost' and a network interface, such as 'jeff.in.idoox.com'. |
| contextPath | The context path of the HTTP server. For example, with the context path '/WSO2 SOA Enablement Server' and a service published on the '/hello' path via localhost:6060, the endpoint is 'http://localhost:6060/wasp/hello'. This parameter is empty by default, meaning that all services are published to the root - '/'. |
| port | The port the server is started on |
| minThreads | Minimum number of threads in a pool waiting to service a new incoming connection |
| maxThreads | Maximum number of threads that will service connections |
| maxIdleTime | Time in milliseconds for an idle thread to wait for a new connection |
| maxReadTime | Time in milliseconds that a connection can be blocked by reading |
HTTPS Locate
HTTPS transport uses HTTP transport and the Sun implementation of JSSE for secure sockets. It is contained in the following classes:
com.idoox.transport.https.Https
HTTPS transport layer class referring to the client and server classes below:
com.idoox.transport.https.client.HttpsClient
HTTPS client only
com.idoox.transport.https.server.Jettys
HTTPS server only
The HTTPS URI looks like:
https://<userinfo>@<host>:<port><path>?<query>#<fragment>
| Note |
|---|---|
We recommend altering the HTTPS configuration through the Admin Console; see HTTPS Server Transport and HTTPS Client Transport. Some of the configuration parameters can be set manually in the httpsPreferences elements of serverconf.xml and clientconf.xml but others are in the transport element of the deployment descriptor contained in WASP_HOME/app/security_providers.jar. If you have an installation of WSO2 SOA Enablement Server for Java that does not include the console, we suggest configuring HTTPS transport at runtime through your application code rather than altering the deployment descriptor. | |
An HTTPS client has the same configuration parameters as an HTTP client, plus the following:
| Parameter | Description |
|---|---|
| checkServerCertificate | Determines whether client checks the server certificate name against the DNS name (default: true) |
An HTTPS server has the same configuration parameters as an HTTP server, plus the following:
| Parameter | Description |
|---|---|
| alias | Identity of certificate used for the server |
| password | Password for the certificate |
| needsClientAuth | Determines whether server requires client authentication (default: false) |
For more information about SSL from the security point of view, please look at SSL and TLS .
File Locate
FILE is a client transport that supports all methods:
POST - flushes output to the file with the path <path>.out, reads input from the file with the path <path>.in if it exists.
GET - opens the file at the given path as a stream
PUT - creates the new file with given path - or truncates the file if it exists - then opens it like a stream
DELETE - deletes file at the given path if it exists
The file transport layer class is com.idoox.transport.file.client.FileClient. Its URI looks like:
file:<path>
The path can be relative or absolute. File transport ignores headers and query parameters.
This transport has no special configuration parameters.
JAR Locate
JAR is a client transport that supports the GET method. The JAR transport layer class is com.idoox.transport.file.client.JarClient.
The JAR URI points to a JAR entry from another URI. It looks like:
jar:<uri>!/<entry>
This transport has no special configuration parameters.
JDK Locate
The JDK transport is a client transport that makes all registered transport handlers in JDK visible to WSO2 SOA Enablement Server. A specific transport name, default, is used for handling schemes that are not explicitly stated in the WSO2 SOA Enablement Server for Java configuration (serverconf.xml or clientconf.xml).
The JDK transport layer class is com.idoox.transport.jdk.client.JdkClient.
Servlet Locate
Servlet transport binds WSO2 SOA Enablement Server for Java to a servlet container. Use servlet transport if you want to use a servlet container rather than standalone WSO2 SOA Enablement Server to service messages or when you are porting WSO2 SOA Enablement Server to an application server.
The Servlet transport layer class is com.idoox.transport.servlet.server.Servlet. Its URI looks like:
<scheme>://<userinfo>@<host>:<port><context_path><path>?<query>#<fragment>
where context_path is the context path of the servlet where it is deployed. Servlet transport registers itself to the transport repository for all schemes that a servlet container uses for servlets (typically HTTP and HTTPS).
This transport has no configuration in WSO2 SOA Enablement Server. It has a deployment descriptor for the servlet container. This descriptor contains the WSO2 SOA Enablement Server for Java servlet class and the initialization parameters. These have the same name and similar function to the System Properties described in System Properties.
Mail Locate
![[Caution]](images/caution.gif) | Caution |
|---|---|
Do not use the same mail account for WSO2 SOA Enablement Server for Java that you use for other email communication. Your messages will be lost! | |
Mail transport provides useful functionality for SOAP over SMTP. It allows one-way SOAP messages to be sent (from the client) and received (on the server). With transport coupling (please see Configuring Coupled Transports) where both client and server have mail accounts, mail transport can also be used for request-response messages.
Mail transport consists of two real transports (POP and SMTP) and one virtual transport registered with the mailto scheme.
Basic mail transport is configured using MailSetupTool. Please see Mail Setup Tool.
SMTP Locate
SMTP transport (Simple Mail Transfer Protocol) is a client transport. It supports the POST method without input, which means that only one-way messages are supported.
The SMTP transport layer class is com.idoox.transport.smtp.client.SmtpClient. Its URI looks like:
smtp://<host>:<port>/<path>
where path is the recipient(s) address.
SMTP has only one configuration parameter. It is an attribute of the transport ... name="smtp_client" element in WASP_HOME/conf/serverconf.xml and clientconf.xml:
defaulttime-out
Default time-out in milliseconds for a connection
POP Locate
POP transport is a client transport that is fully compatible with the POP3 specification. It supports the GET method, which returns the first message from an mailbox or a message with status code NOT_FOUND if the mailbox is empty. If the mailbox contains more than one message, the transport keeps the connection alive in a pool for effectively retrieving more messages. Because the POP3 standard does not allow changes to be committed in the mailbox without closing the connection, the connection is automatically closed and opened again after a set interval in order to update.
The POP client transport layer class is com.idoox.transport.pop.client.PopClient. Its URL looks like:
pop://<userinfo>@<host>:<port>
POP transport has the following configuration parameters, stored as attributes of the transport ... name="pop_client" element in WASP_HOME/conf/serverconf.xml and clientconf.xml:
| Attribute | Description |
|---|---|
| updateInterval | The interval in milliseconds in which a connection to the mailbox is updated if this one is not empty (default: 1 minute) |
| defaulttime-out | Default time-out (in milliseconds) for a connection |
A password is passed to this transport with MAIL_INPUT_PASSWORD in org.systinet.wasp.webservice.ServiceClientContext.
The site scheme can be *, which means any scheme.
Mailto Locate
The most important mail transport is a virtual transport bound to the mailto scheme. This transport can have client mode, server mode or both. It supports the same methods as the client transport, typically the POST method. It does not discern between headers and query parameters. This means that query parameters are set as headers on the client side, .and all headers are accessible as query parameters on the server side.
The Mailto transport layer class is com.idoox.transport.mail.Mail. A Mailto URI looks like:
mailto:<path>?<query>
where path is the comma-separated recipient address(es) and query is a string with query parameters and values. This transport can transfer path and fragment with 'x-wasp-path' and 'x-WSO2 SOA Enablement Server-fragment' headers. In such cases the URI looks like:
mailto:wasp@company.com?x-wasp-path=/MailService/
If 'x-wasp-path' is present, a mail path (wasp@company.com) serves as the context path and the x-wasp-path is the path in the URI.
The Mailto configuration is located in the transport ... name="mail" element. It has an input part and an output part, each with its respective subelement. The output part specifies which server and protocol is used for the output and has the following subelements:
| Element | Description |
|---|---|
| server | The server URI where output is sent (such as smtp://smtp.company.com) |
| from | A reverse path, typically a client address (such as wasp@company.com) |
The input part specifies the server and protocol from which input messages are periodically fetched. Messages are fetched by the GET method; retrieved messages are passed to the connection handler as incoming messages. The input element contains the following subelements:
| Element | Description |
|---|---|
| password | Password for mail input server |
| server | Server URI from which input is taken (such as pop://pop.company.com) |
| sleepInterval | How long (in milliseconds) to wait if no new messages are found |
JMS Transport Locate
Overview Locate
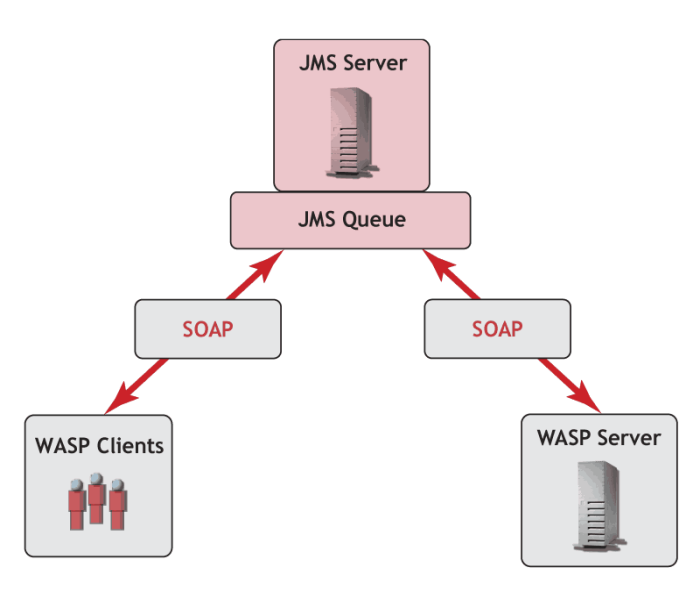
You can build custom pluggable transport layers with WSO2 SOA Enablement Server architecture. WSO2 SOA Enablement Server for Java comes with a JMS implementation of this pluggable transport. Therefore, any WSO2 SOA Enablement Server Web service or client can communicate over JMS. This framework has been tested on the following JMS providers:
Sun's J2EE reference implementation
Sun ONE Application Server 7
BEA's WebLogic 6.1 and 7.0
Orion server 1.6
JBoss application servers
IBM MQSeries
WebsphereMQ
SwiftMQ
SonicMQ
For more information, see Individual Porting Guides for Each Supported AS.
WSO2 SOA Enablement Server for Java supports both JMS Queue and Topic types of communication.
To use JMS transport, both the WSO2 SOA Enablement Server and the client need to know:
Where the JMS server is running
The JMS Destination
The ConnectionFactory
What communication type (topic or queue) is being used.
JMS destination and connection factory name specifications differ on the WSO2 SOA Enablement Server client and server. On the client, this information is taken from the URL given to the JMS transport. On the server, WSO2 SOA Enablement Server must begin listening on the JMS destination at startup. To do that, the JMS destination and Connection Factory must be listed in its configuration file. (See JMS Transport Configuration) or specified when starting WSO2 SOA Enablement Server using the runtime API (see Example 103 )
Example 103. Starting JMS Transport Using WSO2 SOA Enablement Server Runtime API
// Copyright WSO2 Inc. All rights reserved.
// Use is subject to license terms.
package messageProcessing.transports.jmsTransport;

import org.systinet.wasp.Wasp;

public class JmsStart {
    public static void main(String[] args) throws Exception {
        // start WASP server which communicates over SOAP using JMS transport
        Wasp.startServer("jms:queue::testQueue@testQCF:");
        // some code here
        // destroying WASP implicates stopping JMS transport
        Wasp.destroy();
    }
}
JMS transport is divided into server and client packages. 'The client package with JMS transport is WASP_HOME/lib/j2ee_jms_client.jar and the server package is WASP_HOME/conf/porting/dist/j2ee_jms.jar.
Installing Client and Server Side of JMS Transport Locate
The client package with JMS transport is j2ee_jms_client.jar. To use it, add this jar to your CLASSPATH. Install the server side of JMS transport by deploying j2ee_jms.jar. You need special permission to deploy transports: the WASPDeployPermission named 'transport'.
JNDI Properties Locate
By default, JMS transport uses JNDI to obtain JMS administered objects (destination (queue or topic) or connection factory). You must modify WSO2 SOA Enablement Server classpath by adding JAR files that include the client side of the provider's JMS implementation and allow JNDI lookup. The JNDI properties must be set correctly.
For example, with a BEA WebLogic server, the JNDI properties must be set as shown in Example 104 :
Example 104. BEA WebLogic Properties
java.naming.factory.initial=weblogic.jndi.WLInitialContextFactory;
        java.naming.provider.url=t3://localhost:7001
Compare the JNDI properties for a JBoss Server as shown in Example 105 :
JMS Transport Configuration and Destinations Locate
JMS transport configuration is found in the package.xmldeployment descriptor in conf/porting/dist/j2ee_jms.jar (server) and lib/j2ee_jms_client.jar (client). An example of server configuration is given in Example 106 and of client configuration in Example 108.
The following elements can be set in the JMS transport configuration, as shown in Example 106:
| transport | If the preload attribute is set to true, WSO2 SOA Enablement Server begins listening to all predefined destinations when it starts. |
| maxThreads | Maximum number of threads that will be created in JMS transport |
| minThreads | Minimum number of threads that will be created in JMS transport |
| messagePriority | Specifies JMS message priority |
| messageExpiration | JMS message expiration time (in millis) |
| persistent | Boolean specifying whether JMS message will be persistent |
| clientTimeout | The length of time a client will wait for a response before timing out (ms) |
| destination | A destination queue or topic. The destinationName and destinationFactoryName can be arbitrary. If the topic or queue is secured, the username and password have to be specified. |
| reduction | Allows the user to employ a JMS provider other than the ones supported by WSO2 SOA Enablement Server. User has to provide his own reduction in this case. |
Example 106. JMS Transport Server Configuration
<transport name="jms"
           implementation-class="com.idoox.transport.jms.JmsTransport"
           preload="true"
           scheme="jms"
           default-server="true"
           xmlns:jms="http://wso2.com/wasp/package/j2ee_jms">
    <jms:maxThreads>25</jms:maxThreads>
    <jms:minThreads>1</jms:minThreads>
    <jms:messagePriority>6</jms:messagePriority>
    <jms:messageExpiration>15000</jms:messageExpiration>
    <jms:persistent>false</jms:persistent>
    <jms:clientTimeout>60000</jms:clientTimeout>
    <jms:destination type="queue"
                     jmsDestinationName="queue/testQueue"
                     jmsDestinationFactoryName="QueueConnectionFactory"
                     username=""
                     password=""/>
    <jms:destination type="topic"
                     jmsDestinationName="topic/testTopic"
                     jmsDestinationFactoryName="TopicConnectionFactory"
                     username=""
                     password=""/>
    <!-- Here you can add your own reduction or remove unused ones -->
    <!--jms:reduction className="">
        <property key="java.naming.factory.initial" value=""/>
        <property key="java.naming.provider.url" value=""/>
        <property key="" value=""/>
    </jms:reduction-->
    <jms:reduction className="org.systinet.transport.jms.Sun1Reduction"/>
    <jms:reduction className="org.systinet.transport.jms.J2EEReduction"/>
    <jms:reduction className="org.systinet.transport.jms.SwiftMQReduction"/>
    <jms:reduction className="org.systinet.transport.jms.TibcoReduction"/>
    <jms:reduction className="org.systinet.transport.jms.MQSeriesReduction"/>
    <jms:reduction className="com.idoox.transport.jms.JndiReduction"/>
</transport>
The <destination> Element and Multiple Destinations Locate
JMS transport is now able to listen on multiple destinations. Each destination has its own destination element, located in the JMS transport configuration. (See Example 106 ) The element contains five attributes:
type - values are queue (Point to Point communication) or topic (Publish/Subscribe communication--asynchonous messaging only)
jmsDestinationName - name of the queue or topic
jmsDestinationFactoryName - name of connection factory
username
password - these last two specify credentials to be used when accessing JMS connections
For backward compatibility, the JMS configuration also handles attributes like jmsDestinationName, jmsDestinationFactoryName or type outside of the destination element. If present in the configuration, they are treated as a new destination.
The JMS transport configuration may also contain username and password elements when they are not specified in a destination sub-element.
JMS as Embedded Server Locate
When JMS is an embedded server, preload=false. In these cases, WSO2 SOA Enablement Server does not automatically start communications. The user can start transport through WSO2 SOA Enablement Server runtime API by using the wasp.start method with a jms: URL, for example:
wasp.start(jms:queue::myQ@myQCommunicationFactory)
Destinations can still be set in the configuration file, as with standalone server configuration. The JMS transport server then listens both to the destination given in that URL and any destinations set in the configuration file.
JMS Client Configuration Locate
Pure JMS client configuration does not contain any destinations. In this case the JMS transport does not start listening even if preload=true.
In client mode, JMS transport is based on the URL passed to the Web service lookup (please see Example 107 ). There are no destinations defined in the transport configuration and preload is usually set to false, as shown in Example 108. The URL contains the necessary information for sending JMS messages. When JMS transport is loaded, it first reads the configuration and then parses the URL passed to it. It uses the parsed information for sending and receiving messages.
Example 107. Web Service Lookup and Invocation Over JMS
// Copyright WSO2 Inc. All rights reserved.
// Use is subject to license terms.
package messageProcessing.transports.jmsTransport;

import demo.HelloService;

import org.systinet.wasp.webservice.Registry;


public class JmsLookup {
    public static void main(String[] args) throws Exception {
        // lookup service
        HelloService helloService =
            (HelloService) Registry.lookup("jms:queue::jms/Queue@jms/QCF:/helloSerice",
                HelloService.class);
        helloService.hello("Hello over JMS");
    }
}
Example 108. JMS Transport Client Configuration
<transport name="jms"
                    implementation-class="com.idoox.transport.jms.JmsTransport"
                    preload="false"
                    scheme="jms"
                    default-server="true">
       <messagePriority xmlns="http://wso2.com/wasp/package/j2ee_jms">
           6
       </messagePriority>
       <messageExpiration xmlns="http://wso2.com/wasp/package/j2ee_jms">
           15000
       </messageExpiration>
       <persistent xmlns="http://wso2.com/wasp/package/j2ee_jms">
           false
       </persistent>
       <clientTimeout xmlns="http://wso2.com/wasp/package/j2ee_jms">
           60000
       </clientTimeout>
       <!-- Here you can add your own reduction or remove unused ones -->
       <!--reduction className="">
       <property key="java.naming.factory.initial" value=""/>
       <property key="java.naming.provider.url" value=""/>
       <property key="" value=""/>
       </reduction-->
       <reduction xmlns="http://wso2.com/wasp/package/j2ee_jms"
           className="org.systinet.transport.jms.Sun1Reduction"/>
       <reduction xmlns="http://wso2.com/wasp/package/j2ee_jms"
           className="org.systinet.transport.jms.J2EEReduction"/>
       <reduction xmlns="http://wso2.com/wasp/package/j2ee_jms"
           className="org.systinet.transport.jms.SwiftMQReduction"/>
       <reduction xmlns="http://wso2.com/wasp/package/j2ee_jms"
           className="org.systinet.transport.jms.TibcoReduction"/>
       <reduction xmlns="http://wso2.com/wasp/package/j2ee_jms"
           className="org.systinet.transport.jms.MQSeriesReduction"/>
       <reduction xmlns="http://wso2.com/wasp/package/j2ee_jms"
           className="com.idoox.transport.jms.JndiReduction"/>
</transport>
Resolving JMS Administered Objects Locate
Administered objects like queues, topics and connection factories need to be resolved. The standard mechanism is to take their names and perform a JNDI lookup. However, some JMS providers have proprietary APIs that customize the process, with additional parameters or objects with specified names. These proprietary APIs are not accessible through standard JMS API. WSO2 SOA Enablement Server provides two mechanisms for reducing them to an accessible form while preserving their customization functions.
First is a public interface, org.systinet.transport.jms.Reduction. This is a very powerful tool, but in many cases a simpler mechanism will suffice. Thus we also provide an easy-to-use abstract class, org.systinet.transport.jms.ReductionTemplate (JAVADOC link). Any number of reductions can be included in the transport configuration. The first one that succeeds (its check() method returns true) is used to resolve the JMS administered objects.
The reductions are placed in reduction sub-elements in the JMS transport configuration. The reduction sub-element contains one parameter, className. This is the name of the reduction's implementation class and it may contain any number of property sub-elements. The property sub-element contains the attributes name and value. They describe properties passed to the org.systinet.transport.jms.Reduction.startResolving method, such as java.naming.provider.url or java.naming.factory.initial.
Calling WSO2 SOA Enablement Servers That Use Different JMS Providers Locate
Sometimes one client needs to call WSO2 SOA Enablement Server services that use different JMS providers. Reduction is then handled through the Registry.lookup(definitionURL, Class) method. In this method, pass the property jms.reduction.class, the value of which is the name of the reduction class you wish to use.
Other JMS Transport Configuration Options Locate
JMS Transport takes a number of additional parameters, which may be listed in both server and client configuration files.
baseContext - name of context where the transport searches for JMS administered objects. For example, if the baseContext is 'java:' and the name of the JMS queue id is SampleQueue, the transport tries to lookup java:SampleQueue.
clienttime-out - If the JMS transport hangs during synchronous communication, it blocks the client until the time-out expires. The time-out can be configured in the JMS transport configuration by the clienttime-out attribute, which sets the time-out value in milliseconds.
deliveryMode - specifies delivery mode of messages sent. Can be persistent or non-persistent.
durableId - is used with durable topic subscription. The attribute specifies the id for the destination configured by the attributes jmsDestinationName and jmsDestinationFactoryName. You can also use this attribute in a destination sub-element to specify the client identifier for the given destination.
messageExpiration - sets expiration of JMS message sent by the client or server side.
messagePriority - sets priority of JMS message sent by the client or server side.
serverId - allows multiple JMS transports to listen on one destination. The server transport to which the message is sent from the client must have serverId equal to the serverid parameter specified in the JMS URL used.
Note that JMS transport is by default configured in the deployment descriptor of
j2ee_jms.jar. The configuration is in the node package/transport/configuration/config.
Specifying URL for JMS Transport Locate
The JMS URL which WSO2 SOA Enablement Server clients use to identify a WSO2 SOA Enablement Server service has the following format:
jms:[serverid=SERVER_ID],[durableid=CLIENT_IDENTIFIER]:queue|topic::
        DEST[REPLY_TO_DEST]@FACTORY[:PATH][?QUERY][#FRAGMENT]
FACTORY
queue or topic factory name
DEST
name of the destination
SERVER_ID
the server selector value
CLIENT_IDENTIFIER
destination id, used with durable topic subscription
REPLY_TO_DEST
value used for reply message
PATH, FRAGMENT and QUERY
These terms have the same meanings as the corresponding parts of the URI - see (JAVADOC link to the class org.idoox.transport.URI)
If the JMS URI contains the keyword queue, the messages will be transferred using JMS queue and queue factory. If it contains the keyword topic, JMS topics will be used.
After the destination (DEST) name is an optional reply-to destination name (REPLY_TO_DEST). If it is used, the messages that are sent from server to client will be passed using this destination.
If more than one server uses the same destination, use the serverid parameter. This ensures messages will be received by the intended server. Alternately, you can set serverId as an attribute in the JMS configuration.
The container's demo client would point to the container's service, for example: jms:serverID=firstserver:topic::jms/Queue(jms/MyQueue)@jms/QCF:/containers/
| Note |
|---|---|
If using both serverid and durableid, they must be separated by a comma. | |
Asynchronous Use of JMS Transport Locate
JMS transport can be used when coupling two transports as well as in one-way method calls.
Choice of communication type depends on whether transport is synchronous or asynchronous:
Topics can only be used for asynchronous communication. (See JMS Binding).
Queues can be used for both types of communication.
Running Demos Over JMS Transport Locate
Most WSO2 SOA Enablement Server for Java demos are able to run over JMS transport instead of HTTP. To run a demo, go to the home directory of the demo. Then, to run the demo over JMS queue, type run.bat run_jms_queue (Windows) or run.sh run_jms_queue (UNIX). If the demo features one-way messaging, it may be run over JMS topic as well. To run the demo over JMS topic, type run.bat run_jms_topic (Windows) or run.sh run_jms_topic (UNIX).
| Note |
|---|---|
JMS topic works only with one-way messaging. | |
JMS Binding Locate
JMS provides two types of messaging:
Messaging over a JMS queue
JMS topics
Both types define how JMS messages get from the message producer to the message consumer and the structure of the message. The difference between the topic and queue types are:
Table 7. Topic vs. Queue Messaging
| Topic | Queue | ||||
|---|---|---|---|---|---|
Message delivered simultaneously to all active subscribers to the topic.
| Point-to-point: Message is delivered to only one consumer. This is the first consumer to take the message from the front of the message queue. | ||||
In addition to the message body, a JMS message has a number of properties, which enable meta-data to be sent and which can be used by consumers to select a message from the topic or queue using a message selector. Please see Properties in the JMS Message for details.
JMS defines a number of types of JMS messages. Every type is suitable to hold a specific type of data.
To send or receive a message over JMS, the participant must establish a connection, which it then uses to send or receive the message. To create the connection, he needs the JMS destination (queue or topic) and connection factory (queue or topic connection factory). Both objects are provided by JMS provider and are usually accessible through JNDI lookup.
The mapping of a SOAP message to a JMS message is straightforward. The SOAP message is sent in the body of the JMS message. Text messages are the preferred type for transferring SOAP messages because the JMS specification prefers such messages for holding XML-like data. Nevertheless, any type of JMS message can hold a SOAP message. Because we use the transport layer for other purposes as well, like sending binary data in attachments, our default implementation uses bytes messages. The first entry in the bytes message is a integer value of the length of data which follows as a byte array of the specified length.
Our JMS transport implementation supports the SOAP request-response pattern and the SOAP response message pattern. Because JMS defines only how the message is delivered from the message producer to the message consumer, we need an additional mechanism to support request-response pairs over JMS. Because the SOAP response message pattern needs a GET request to deliver a response, both patterns can be mapped to request-response pairs. Just note that we recognize these patterns using a property of the JMS message and that the message which represents the GET request has an empty body.
JMS topic messaging cannot handle responses over the same transport. Only one-way calls may deliver messages over JMS topics. Request-response calls, whether synchronous or asynchronous, must use JMS queues. JMS topics, however, are more suitable for one-way and broadcast operations.
We assume that all calls over JMS queue expect a response. Therefore, every message sent over JMS queue must include the information needed to create a response, although the information may remain unused.
The client identifies the server via a JMS URI, which identifies the JMS destination, JMS connection factory and additional information to identify the consumer of JMS messages.
Performing GET operations over JMS Locate
To perform a GET operation over JMS, we use the same mechanism that we use for the SOAP response message.
Properties in the JMS Message Locate
In addition to the message body, a JMS message has a number of properties, which enable meta-data to be sent and which can be used by consumers to select a message from the topic or queue using a message selector. Table 8, “Web Service Invocation-Related Properties” describes properties and their meaning in the outgoing JMS request message.
Table 8. Web Service Invocation-Related Properties
| Name | Type | Description | Required? |
|---|---|---|---|
| CALL_METHOD | int | Call method, in org.idoox.transport.TransportMethod._* | Yes |
| MSG_CLIENT_URI_PATH | string | path part of the URL, identifies service endpoint | Yes |
| MSG_TYPE | string | JmsConstants.TYPE_REQUEST | Yes |
| CorrelationID | JMS | Required for messages passed over JMS queues | See description |
| MSG_HDR | string | See format of header string | No |
| SERVER_SELECTOR | string | Server ID | No |
| MSG_SC | string | Status code, a string value of org.idoox.transport.Message.SC_* | No |
| MSG_CLIENT_URI_REPLY_NAME | string | Name of the destination to which the reply message will be sent | No |
| Additional URL mapping properties for sections of the JMS URL: | |||
| MSG_CLIENT_URI_USERINFO | string | User information section of the URL | No |
| MSG_CLIENT_URI_PORT | string | Port section of the URL | No |
| MSG_CLIENT_URI_FRAGMENT | string | Fragment section of the URL | No |
| MSG_CLIENT_URI_QUERY | string | Query section of the URL | No |
| MSG_CLIENT_ADDRESS | string | IP address of the client | No |
| The format of the incoming response message: | |||
| MSG_HDR | string | See format of header string | No |
| SERVER_SELECTOR | string | Server ID | No |
| MSG_SC | int | Status code, org.idoox.transport.Message.SC_* | No |
| MSG_TYPE | string | JmsConstants.TYPE_RESPONSE | No |
| CorrelationID | JMS | Required for messages passed over JMS queues | See description |
| Note |
|---|---|
* : Names of properties (except of JMS type) are equal to field names in the class org.systinet.transport.jms.JmsConstants and real values are held within these fields. For example, MSG_HDR means the value of the field org.systinet.transport.jms.JmsConstants.MSG_HDR | |
Message Selection Locate
To select messages on the server side, the JMS transport uses a selector built from the MSG_TYPE value and the server ID value if available:
String selector = JmsConstants.MSG_TYPE + "='"
                + JmsConstants.TYPE_REQUEST + ((serverSelector == null) ? "'" : (" AND "
                + JmsConstants.SERVER_SELECTOR + "='" + serverSelector + "'"));
To select messages on the client side, the JMS transport uses a selector built from the MSG_TYPE value, a correlation id which must be equal to the correlation id set on the outgoing request message, and the server ID value if available :
String selector = JmsConstants.MSG_TYPE + "='"
                + JmsConstants.TYPE_RESPONSE + "' AND JMSCorrelationID='"
                + getCallID() + "'" + ((serverSelector == null) ? "" : (" AND "
+ JmsConstants.SERVER_SELECTOR + "='" + serverID + "'")); | Note |
|---|---|
This implementation is provided by default JMS transport implementation. It may be customized by implementing the interface org.systinet.transport.jms.Reduction. | |
Format of the Header String Locate
Headers are set on the input and output messages in our transport implementation. They are usually mapped on HTTP headers by the HTTP transport implementation but the JMS implementation supports them as well. They are mapped like a query string in the HTTP url, as name=value pairs separated by &
For example, this header string contains header values v1, v2 and v3 for headers h1, h2 and h3 :
h1=v1&h2=v2&h3=v3
If necessary, this string may be encoded. By default, no encoding is applied.
Custom Transports Locate
Introduction Locate
This chapter demonstrates how to create your own transport with a simple but fully working sample transport called Jumbo.
JumboTransport Class Locate
Your own transport must implement the interface org.idoox.transport.Transport. To enable it to be configured at runtime (for example, by changing the listening port) you should also implement java.beans.VetoableChangeListener. The whole class is shown in Example 109.
Example 109. JumboTransport
package example.processing.transport;

import org.idoox.config.Configurable;

import org.idoox.transport.Transport;
import org.idoox.transport.TransportMethod;
import org.idoox.transport.TransportStartException;
import org.idoox.transport.URI;
import org.idoox.transport.client.ClientConnection;
import org.idoox.transport.client.Endpoint;
import org.idoox.transport.server.ConnectionHandler;

import org.idoox.util.RuntimeWrappedException;

import java.beans.PropertyChangeEvent;
import java.beans.PropertyVetoException;
import java.beans.VetoableChangeListener;

import java.io.IOException;
import java.io.InterruptedIOException;

import java.net.InetAddress;
import java.net.MalformedURLException;
import java.net.ServerSocket;
import java.net.Socket;
import java.net.UnknownHostException;

import java.util.HashSet;
import java.util.Map;
import java.util.Set;


public class JumboTransport implements Transport,
    VetoableChangeListener {
    // transport methods - GET and POST
    public static final Set METHODS = new HashSet(2);

    static {
        METHODS.add(TransportMethod.POST);
        METHODS.add(TransportMethod.GET);
    }

    // server endpoint or 'null' - no server, only client
    private Endpoint serverEndpoint;

    // server socket or 'null' - server is not started
    private ServerSocket serverSocket;

    // server thread for incomming connections
    private ServerThread serverThread;

    // connection handler for new incomming connections
    private ConnectionHandler conHandler;

    // connection timeout
    private nt timeout;

    public void load(Configurable configurable) {
        // default configuration for this transport
        JumboConfig config =
            (JumboConfig) configurable.narrow(JumboConfig.class);

        // port
        int port = -1;

        try {
            port = config.getPort();
        } catch (Exception e) {
            // it throws en exception when the port is not in the configuration
        }

        // connection timeout
        this.timeout = 0;

        try {
            this.timeout = config.getTimeout();
        } catch (Exception e) {
            // it throws an exception when the timeout
           // is not in the configuration
        }

        // default server endpoint
        if (port != -1) {
            try {
                String hostName = InetAddress.getLocalHost()
                                             .getHostName();
                this.serverEndpoint =
                    new Endpoint(
                        config.getScheme(),
                        null,
                        hostName,
                        port,
                        null,
                        "/");
            } catch (UnknownHostException e) {
                throw new RuntimeWrappedException(e);
            }
        }

        // register listener on configurable
        configurable.addVetoableChangeListener(this);
    }

    public void destroy() {
    }

    public int getType() {
        int type = CLIENT;

        if (this.serverEndpoint != null) {
            type |= SERVER;
        }

        return type;
    }

    public Set getMethods() {
        return METHODS;
    }

    public void start(URI uri) throws TransportStartException {
        if (uri != null) {
            // started with an URI at runtime
            try {
                this.serverEndpoint = new Endpoint(uri.toExternalForm());
                this.serverEndpoint.setPath("/");

                // it ignores context path from the URI for simplicity
            } catch (MalformedURLException e) {
                throw new TransportStartException(e);
            }
        }

        // start server thread with new server socket
        System.out.println("Starting server " + this.serverEndpoint);

        try {
            // new server socket
            this.serverSocket =
                new ServerSocket(this.serverEndpoint.getPort());
            this.serverSocket.setSoTimeout(500);

            // start new server thread
            this.serverThread = new ServerThread();
            this.serverThread.start();
        } catch (IOException e) {
            throw new TransportStartException(e);
        }
    }

    public void stop() {
        if (this.serverSocket != null) {
            System.out.println("Stoping server " + this.serverEndpoint);

            synchronized (this.serverThread) {
                this.serverThread.stopping = true;

                try {
                    this.serverThread.wait(0);
                    this.serverSocket = null;
                } catch (InterruptedException e) {
                    ; // iterrupt on current thread
                }
            }
        }
    }

    public boolean isStarted() {
        return this.serverSocket != null;
    }

    public ConnectionHandler setHandler(ConnectionHandler connectionHandler) {
        ConnectionHandler oldOne = this.conHandler;
        this.conHandler = connectionHandler;

        return oldOne;
    }

    public String getLocalPath(URI uri) {
        // port
        if (this.serverEndpoint.getPort() != uri.getPort()) {
            return null;
        }

        // host name
        try {
            InetAddress hn1 =
                InetAddress.getByName(this.serverEndpoint.getHost());
            InetAddress hn2 = InetAddress.getByName(uri.getHost());

            if (!hn1.equals(hn2)) {
                return null;
            }
        } catch (UnknownHostException e) {
            return null;
        }

        // path
        String path = uri.getPath();

        if (uri.getContextPath() != null) {
            path = uri.getContextPath() + path;
        }

        if (!path.startsWith(this.serverEndpoint.getPath())) {
            return null;
        }

        // return local path
        return path.substring(this.serverEndpoint.getPath().length() - 1);
    }

    public Endpoint[] getAbsolutePath(String path)
        throws MalformedURLException {
        return new Endpoint[] { new Endpoint(this.serverEndpoint, path) };
    }

    public ClientConnection newConnection(
        URI uri,
        TransportMethod transportMethod,
        Map properties) throws IOException {
        Socket socket = new Socket(
                uri.getHost(),
                uri.getPort());
        socket.setSoTimeout(this.timeout);

        return new JumboConnection(socket, uri, transportMethod);
    }

    // example of configuration change at runtime
    public void vetoableChange(PropertyChangeEvent event)
        throws PropertyVetoException {
        if (event.getPropertyName()
                 .equals("timeout")) {
            // timeout
            if (event.getNewValue() != null) {
                this.timeout = ((Integer) event.getNewValue()).intValue();
                System.out.println("timeout is changed to: " + this.timeout);
            }
        }

        // other config properties ... see JumboConfig
    }

    public class ServerThread extends Thread {
        public boolean stopping = false;

        public ServerThread() {
            super("JumboServer");
        }

        public void run() {
            // it's only single thread server for simplicity
            while (true) {
                try {
                    Socket socket = serverSocket.accept();
                    socket.setSoTimeout(timeout);

                    JumboConnection newConnection =
                        new JumboConnection(socket, serverEndpoint);

                    switch (newConnection.getMethod()
                                         .value()) {
                    case TransportMethod._GET:
                        conHandler.handleGet(newConnection);

                    case TransportMethod._POST:
                        conHandler.handlePost(newConnection);
                    }
                } catch (InterruptedIOException e) {
                    // accept timeouted
                    synchronized (this) {
                        if (this.stopping) {
                            try {
                                serverSocket.close();
                            } catch (IOException e1) {
                                ; // ignore IOException during close
                            }

                            notify();

                            break;
                        }
                    }
                } catch (Exception e) {
                    // another exceptions
                    e.printStackTrace();
                }
            }
        }
    }
}
JumboTransport also contains the inner class ServerThread that handle incoming connections. Description of important methods follows.
Server and Client Locate
This example uses the same class for client and server transports. You can get the mode of the transport by calling the method getType(). This method checks if the serverEndpoint class has been created, meaning the transport is being used on the server side. If serverEndpoint has not been created, the transport is being used on the client side.
serverEndpoint can be created in the methods start() and load() (described below).
The load() Method Locate
There are two things that can be configured the listening port and the time-out. At first we set both to default values. Then we try to narrow the configuration taken from the Deployment Descriptor to the class JumboConfig (see the section JumboTransport Configuration). More about narrowing and the org.idoox.config.Configurable interface can be found in Custom Configuration, in Writing Web Services.
If the narrowed configuration contains any values, they replace the default ones. A port value other then default means that the transport can be used as a server transport (ServerThread can be started), so the serverEndpoint is created.
Finally, the Transport class registers itself as VetoableChangeListener on the narrowed JumboConfig class. From this moment on you are able to change the transports configuration at runtime. This feature can be used to configure transport from WSO2 SOA Enablement Server for Java Admin Console. For more information, please see the section JumboTransport Configuration.
The start() Method Locate
The method is called if transport is marked as preloaded in the Deployment Descriptor (see the section JumboTransport Configuration) if the transport is set as asynchronous on the client side (ServiceClient.setAsyncTransport()) or manually.
If you are calling this method manually, you can pass a URI that will be used to create a different endpoint then the one stored in configuration.
Then the ServerThread is created and started.
Inner Class ServerThread Locate
This class creates a socket and listens for incoming connections. After a connection is made it creates a new JumboConnection and sends it to registered handler. The handler is registered by WSO2 SOA Enablement Server automatically during initialization of transport to guarantee that the handler will be registered before ServerThread is run for the first time.
The newConnection() Method Locate
This method is used to create a new connection on client side.
The JumboConnection Class Locate
This class is used for both client and server connections, meaning it implements both ServerConnection and ClientConnection. It also has two constructors, one for client-side and one for server-side.
Example 110. JumboConnection
package example.processing.transport;

import org.idoox.transport.InputMessage;
import org.idoox.transport.OutputMessage;
import org.idoox.transport.TransportMethod;
import org.idoox.transport.URI;
import org.idoox.transport.client.ClientConnection;
import org.idoox.transport.client.Endpoint;
import org.idoox.transport.server.ServerConnection;

import java.io.IOException;

import java.net.Socket;


/*
 * JUMBO protocol:
 *
 * 5 bytes: <number of headers>
 * 5 bytes: <1st header-name size>
 *        : <1st header-name>
 * 5 bytes: <1st header-value size>
 *        : <1st header-value>
 * ...
 * 5 bytes: <1st chunk size>
 *        : <1st chunk>
 * ...
 * 5 bytes: 00000
 */
public class JumboConnection implements ClientConnection,
    ServerConnection {
    public static final String LOCATION_HEADER = "x-jumbo-location";
    public static final String METHOD_HEADER = "x-jumbo-method";
    public static final String SC_HEADER = "x-jumbo-status";
    private Socket socket;
    private URI endpoint;
    private TransportMethod method;
    private InputMessage input;
    private OutputMessage output;

    // for the client side
    public JumboConnection(
        Socket socket,
        URI endpoint,
        TransportMethod method) throws IOException {
        this.socket = socket;
        this.endpoint = endpoint;
        this.method = method;

        // input & output message
        if (method == TransportMethod.POST) {
            this.output = new JumboOutputMessage(socket.getOutputStream());
            this.input = new JumboInputMessage(socket.getInputStream());
        } else if (method == TransportMethod.GET) {
            this.output = new JumboOutputMessage(socket.getOutputStream());
            this.input = new JumboInputMessage(socket.getInputStream());
        } else {
            throw new IOException("Method " + method
                + " isn't supported JUMBO protocol");
        }

        // sends URI location to the server
        this.output.setStringHeader(
            LOCATION_HEADER,
            endpoint.getLocation());

        // sends tranport method to the server
        this.output.setStringHeader(
            METHOD_HEADER,
            method.toString());

        // do request for GET method
        if (method == TransportMethod.GET) {
            this.output.close();
            this.output = null;
        }
    }

    // for the server side
    public JumboConnection(
        Socket socket,
        URI endpoint) throws IOException {
        this.socket = socket;

        // input & output message
        this.input = new JumboInputMessage(socket.getInputStream());
        this.output = new JumboOutputMessage(socket.getOutputStream());

        // gets URI location from the input message
        String location = this.input.getStringHeader(LOCATION_HEADER);
        this.endpoint = new Endpoint(endpoint, location);

        // gets transport method from the input message
        String method = this.input.getStringHeader(METHOD_HEADER);
        this.method = TransportMethod.fromString(method);

        // close request for GET method
        if (this.method == TransportMethod.GET) {
            this.input.close();
            this.input = null;
        }
    }

    publicvoid setTimeout(int timeout) throws IOException {
        this.socket.setSoTimeout(timeout);
    }

    public InputMessage getInputMessage() {
        return this.input;
    }

    public void setInputMessage(InputMessage inputMessage) {
        this.input = inputMessage;
    }

    public OutputMessage getOutputMessage() {
        return this.output;
    }

    public void setOutputMessage(OutputMessage outputMessage) {
        this.output = outputMessage;
    }

    public TransportMethod getMethod() {
        return this.method;
    }

    public URI getURI() {
        return this.endpoint;
    }

    public String getClientAddress() {
        return this.socket.getInetAddress()
                          .getHostName();
    }
}
Server-Side Constructor Locate
Creates a new JumboInputMessage and JumboOutputMessage.
Creates a new endpoint from serverEndpoint
Gets TransportMethod (GET/POST) from JumboInputMessage.
Then, if TransportMethod is GET (implying that only headers remain to be sent from client to server), JumboInputMessage is closed.
Client-Side Constructor Locate
This constructor is very similar to its server-side equivalent, the only difference being that headers are set. Again, JumboOutputMessage is closed when the TransportMethod is GET because all remaining information to be sent is contained in headers.
The JumboInputMessage Class Locate
JumboInputMessage should extend org.idoox.transportRawInputMessage. JumboInputMessage implements the Jumbo communication protocol. The protocol consists of headers and chunks as shown in Example 111 .
Example 111. Jumbo Transport Protocol
/*
    * JUMBO protocol:
    * * 5 bytes: <number of headers>
    * 5 bytes: <1st header-name size>
    * : <1st header-name>
    * 5 bytes: <1st header-value size>
    * : <1st header-value>
    * ... * 5 bytes: <1st chunk size>
    * : <1st chunk>
    * ...
    * 5 bytes: 00000
*/
The most important part of JumboInputMessage is the inner class ChunkableInputStream. In the constructor of JumboInputMessage we set the incoming stream into the constructor of ChunkableInputStream.
Example 112. JumboInputMessage
package example.processing.transport;

import org.idoox.transport.RawInputMessage;

import java.io.FilterInputStream;
import java.io.IOException;
import java.io.InputStream;

import java.util.HashMap;
import java.util.Map;
import java.util.Set;


public class JumboInputMessage extends RawInputMessage {
    private Map headers;

    public JumboInputMessage(InputStream inputStream) {
        super(null);
        setWrappedStream(new ChunkableInputStream(inputStream));
    }

    public int getStatusCode() throws IOException {
        return getIntHeader(JumboConnection.SC_HEADER);
    }

    public Set getHeaderNames() throws IOException {
        if (this.headers == null) {
            // parse headers
            initStream();
            this.isInited = true;
        }

        return this.headers.keySet();
    }

    public String getStringHeader(String name) throws IOException {
        if (this.headers == null) {
            // parse headers
            initStream();
            this.isInited = true;
        }

        return (String) this.headers.get(name.toLowerCase());
    }

    protected void initStream() throws IOException {
        // receive headers
        ChunkableInputStream in = (ChunkableInputStream) getWrappedStream();
        int numHeaders = in.readInt();
        this.headers = new HashMap(numHeaders);

        for (int i = 0; i < numHeaders; i++) {
            String name = in.readString();
            String value = in.readString();
            this.headers.put(
                name.toLowerCase(),
                value);
        }
    }

    private class ChunkableInputStream extends FilterInputStream {
        private int size = 0;

        public ChunkableInputStream(InputStream in) {
            super(in);
        }

        public int readInt() throws IOException {
            byte[] buffer = new byte[5];
            readBuffer(buffer);

            return Integer.parseInt(new String(buffer));
        }

        public String readString() throws IOException {
            int length = readInt();
            byte[] buffer = new byte[length];
            readBuffer(buffer);

            return new String(buffer);
        }

        private void readBuffer(byte[] buffer) throws IOException {
            for (int i = 0; i < buffer.length; i++) {
                int x = in.read();

                if (x < 0) {
                    throw new IOException("The socket is closed");
                }

                buffer[i] = (byte) x;
            }
        }

        public int read(byte[] b) throws IOException {
            return read(b, 0, b.length);
        }

        public int read(
            byte[] b,
            int off,
            int len) throws IOException {
            for (int i = 0; i < len; i++) {
                int x = read();

                if (x < 0) {
                    if (i == 0) {
                        return -1;
                    } else {
                        return i;
                    }
                }

                b[i + off] = (byte) x;
            }

            return len;
        }

        public int read() throws IOException {
            if (this.size == -1) {
                // it's closed
                return -1;
            }

            if (this.size == 0) {
                // new chunk?
                this.size = readInt();

                if (this.size == 0) {
                    // end of message
                    this.size = -1;

                    return -1;
                }
            }

            this.size--;

            return in.read();
        }

        public long skip(long n) throws IOException {
            for (int i = 0; i < n; i++) {
                if (read() < 0) {
                    return i;
                }
            }

            return n;
        }

        public int available() throws IOException {
            return this.size;
        }

        public void close() throws IOException {
        }
    }
}
The JumboOutputMessage Class Locate
This class is very similar to JumboInputMessage. This can be seen in Example 113 .
Example 113. JumboOutputMessage
package example.processing.transport;

import org.idoox.transport.RawOutputMessage;

import java.io.FilterOutputStream;
import java.io.IOException;
import java.io.OutputStream;

import java.util.HashMap;
import java.util.Iterator;
import java.util.Map;


public class JumboOutputMessage extends RawOutputMessage {
    private Map headers = new HashMap();

    public JumboOutputMessage(OutputStream outputStream) {
        super(null);
        setWrappedStream(new ChunkableOutputStream(outputStream));
    }

    public void setStatusCode(int sc) {
        setIntHeader(JumboConnection.SC_HEADER, sc);
    }

    public void setStringHeader(
        String name,
        String value) {
        this.headers.put(name, value);
    }

    protected void initStream() throws IOException {
        // send headers
        ChunkableOutputStream out = (ChunkableOutputStream) getWrappedStream();
        out.writeInt(this.headers.size());

        for (Iterator i = this.headers.entrySet()
                                      .iterator(); i.hasNext();) {
            Map.Entry header = (Map.Entry) i.next();
            out.writeString((String) header.getKey());
            out.writeString((String) header.getValue());
        }
    }

    private class ChunkableOutputStream extends FilterOutputStream {
        private byte[] buffer = new byte[2048];
        private int size = 0;

        public ChunkableOutputStream(OutputStream out) {
            super(out);
        }

        public void writeInt(int num) throws IOException {
            if (num > 99999) {
                throw new IOException("Number can not be greater than 99999");
            }

            String str = String.valueOf(num);

            for (int i = str.length(); i < 5; i++) {
                out.write('0');
            }

            out.write(str.getBytes());
        }

        public void writeString(String str) throws IOException {
            writeInt(str.length());
            out.write(str.getBytes());
        }

        public void write(byte[] b) throws IOException {
            write(b, 0, b.length);
        }

        public void write(
            byte[] b,
            int off,
            int len) throws IOException {
            for (int i = 0; i < len; i++) {
                write(b[off + i]);
            }
        }

        public void write(int b) throws IOException {
            if (this.size >= this.buffer.length) {
                // dump output
                flush();
            }

            this.buffer[this.size] = (byte) b;
            this.size++;
        }

        public void flush() throws IOException {
            if (this.size > 0) {
                writeInt(this.size);
                out.write(this.buffer, 0, this.size);
                this.size = 0;
                out.flush();
            }
        }

        public void close() throws IOException {
            flush();
            writeInt(0);
        }
    }
}
The JumboConfig Class Locate
This class extends TransportConfig and is used to narrow the configuration taken from the deployment descriptor (please see the section JumboTransport Configuration).
JumboTransport Configuration Locate
Creating a Package for a Custom Transport Locate
You can create two types of package, preloaded and non-preloaded. The difference is that the transport in a preloaded package will be started automatically (in fact, JumboTransport.start() will be called automatically). If you want to start the transport contained in non-preloaded package, you have to call the start() method manually. In both cases you have to write your own deployment descriptor and use it to create the package.
Deployment Descriptor Locate
The deployment descriptor should be similar to Example 115 :
Example 115. Deployment Descriptor for JumboTransport
<package name="jumbo_transport_preloaded"
    xmlns="http://wso2.com/wasp/package/1.2"
    targetNamespace="http://wso2.com/example/transport/jumbo/"
    version="1.0">
    <documentation url="http://www.wso2.com/">
        <display-name>JUMBO Transport Preloaded</display-name>
        <description>JUMBO Transport Preloaded</description>
        <small-icon>http://www.wso2.com/images/logo_others.gif</small-icon>
    </documentation>
    <transport name="jumbo"
        scheme="jumbo"
        implementation-class="example.processing.transport.JumboTransport"
        preload="true"
        default-server="true"
        xmlns:jumbo="http://wso2.com/example/transport/jumbo/">
        <jumbo:port>1919</jumbo:port>
        <jumbo:time-out>40000</jumbo:time-out>
    </transport>
</package>
The deployment descriptor contains the persistent configuration. At runtime, the JumboConfig interface corresponds to the XML schema of the persistent configuration via the JavaBeans pattern. Look at the elements jumbo:port and jumbo:time-out at the end of the descriptor. These are used for narrowing at runtime when the transport is loaded. Specifically, these values are got by port = config.getPort(); and this.time-out = config.gettime-out(); in the load() method of JumboTransport. The configuration can be done either in the deployment descriptor or at runtime by Configurator.newRuntimeConfigurable(), as shown in JumboEmbeddedServer. More about narrowing and the org.idoox.config.Configurable interface can be found in Custom Configuration.
Say if the package should be preloaded or not through the attribute preload.
Building the Package Locate
Given a deployment descriptor saved in the file package.xml, you build the package with the WaspPackager tool:
WaspPackager --client -s classes_dir --dd package.xml -o jumbo.jar
The directory classes_dir contains the compiled classes JumboConfig, JumboTransport, JumboConnection, JumboInputMessage and JumboOutputMessage.
Using the Package Locate
There are three ways you can use a transport package:
You can deploy a preloaded package into a running WSO2 SOA Enablement Server server. In this case the transport will be available for all deployed services. Its configuration will be taken from the deployment descriptor (How to change this configuration at runtime will be shown later).
If you are using an embedded server, simply put the preloaded package on its classpath.
If you want to use the transport on the client side, remove the configuration elements from a non-preloaded deployment descriptor, make the package and put it on the client's classpath.
Configuring a Custom Transport from the Admin Console Locate
To configure a custom transport from the administration console, you must first add a tab for this transport to the Server Preferences form (see Server Preferences Management). This is only possible when transport configuration is in a persistently deployed package.
Perform the following steps to add the Jumbo transport to the Admin Console:
Edit WASP_HOME/app/system/mgmt_services/WASP-INF/package.xml adding the following metatransport element to service-instance name=AdminServiceInstance:
<service-instance name="AdminServiceInstance"
...
    <metatransport
	  xmlns="http://wso2.com/wasp/package/extension"
	  name="Jumbo" matchName="*[jumbo]"
	  implClass="example.processing.transport.JumboTransport">
        <subtype type=""
	  	 iface="example.processing.transport.JumboConfig"
		 confType="transport"
		 confTypeSpec="@matchName"/>
    </metatransport>
</service-instance>
Remove the file WASP_HOME/app/system/mgmt_services/WASP-INF/wasp.xml
Restart WSO2 SOA Enablement Server.
You can now configure the Jumbo transport in the Admin Console, like a built-in transport:
Open the administration console, either through a desktop icon or pointing a browser at http://localhost:6060/admin/console
Click on the Server Preferences tab in the upper right corner. After logging in (default id admin, password changeit), this loads the Server Preferences form.
Click on the Transport tab. This opens a row of tabs for all Transports. There should be a new tab for Jumbo where you can change the time-out for the JumboTransport. Please see VetoableChangeListener in the class JumboTransport.
Running the Jumbo Transport Demo Locate
You can choose between running a persistently deployed service and an embedded server.
Persistent Deployment Locate
Start WSO2 SOA Enablement Server
Deploy preloaded package with Jumbo transport
Execute the following command:
Deploy --class example.basics.webservices.HelloServiceImpl --uri /HelloService
Embedded Server Locate
Run JumboEmbeddedServer with a preloaded package with Jumbo transport on the classpath.
| Note |
|---|---|
The server starts the transport on one more port than is configured in Deployment Descriptor, so the service will be accessible through two endpoints with different port. | |
Example 116. JumboEmbeddedServer
package example.processing.transport;

import example.basics.webservices.HelloServiceImpl;

import org.idoox.config.Configurable;
import org.idoox.config.Configurator;

import org.systinet.wasp.Wasp;
import org.systinet.wasp.webservice.Registry;

import java.util.Arrays;


public class JumboEmbeddedServer {
    public static void main(String[] args) throws Exception {
        // start new JUMBO server on default port
        Wasp.startServer("jumbo");

        // start second JUMBO server with own configuration
        Configurable c = Configurator.newRuntimeConfigurable();
        JumboConfig config = (JumboConfig) c.narrow(JumboConfig.class);
        config.setPort(3939);
        config.setTimeout(60000);
        Wasp.startServer("jumbo", c);

        // publish HelloWorld service
        Registry.publish(
            "/HelloService",
            new HelloServiceImpl());
        System.out.println("Service is published on: "
            + Arrays.asList(Wasp.getAbsolutePath("/HelloService/wsdl")));
    }
}
Running the Client Locate
Now you can run the client with the URL of the service's WSDL as the parameter, such as jumbo://jumbo:1919/HelloService/wsdl.
Please note that you have to put the package on the client classpath as per the instructions for using a custom transport on the client side given in Using a Package, above.
Example 117. Jumbo Client
package example.processing.transport;

import org.systinet.wasp.rpc.WaspCall;
import org.systinet.wasp.webservice.ServiceClient;


public class JumboClient {
    public static void main(String[] args) throws Exception {
        // args[0] is WSDL URL
        if (args.length == 0) {
            System.out.println("Usage: java " + JumboClient.class.getName()
                + " <WSDL_URL>");

            return;
        }

        // create simple dynamic call to HelloWorld Service
        ServiceClient client = ServiceClient.create(args[0]);
        WaspCall call = client.createCall("hello");
        System.out.println(call.invoke(new Object[] { "world" }));
    }
}
Interceptors Locate
Overview Locate
Interceptors are at the lowest level of message processing. For input, they accept a raw transport message. They modify it and return a transport message as output. This level has no notion of XML or higher level protocols, so it is able to do such things as converting non-XML protocols into XML protocols and vice-versa.
In WSO2 SOA Enablement Server, interceptors are used in these ways and others:
Dumping messages into the debug console
Computing message statistics, such as average message length
Performing authentication
Transforming the incoming message via XSLT
Blocking or allowing requests depending on requester's IP address (IPFilterInterceptor)
Restricting message size (MsgSizeCheckerInterceptor)
The following two sections are an overview of when you should consider writing interceptors, how to write them and how to configure WSO2 SOA Enablement Server to use them.
Interceptor Use Cases Locate
You should write interceptors if:
You want to perform operations with transport headers before the message is processed. An example of this class of interceptors might be a basic authentication interceptor (already included in WSO2 SOA Enablement Server).
You want to check/refuse the message in its raw form. One example might be an interceptor for limiting message size (already included in WSO2 SOA Enablement Server).
You want to perform global transformations on the message, such as an XSLT transformation.
How to Write an Interceptor Locate
API Overview Locate
An interceptor is a stateless class implementing the org.idoox.wasp.interceptor.TransportInterceptor interface. An interceptor must implement the following methods (called for each message):
load(config) - called before the interceptor is used. This function can be used for loading the configuration of the interceptor.
intercept(connection, chain, position) - intercepts the incoming/outgoing connection. The connection object contains get/set methods for incoming and outgoing transport messages. These methods allow you to modify the message as shown in Example 119.
![[Important]](images/important.gif) | Important |
|---|---|
You must ALWAYS use wrappers if you want to modify messages (wrappers and their use are described in Interceptors That Modify the Message | |
void destroy() - called when the interceptor is no longer used. This function is always called on the server side of WSO2 SOA Enablement Server. On the client side, it is called only if the client explicitly calls wasp.destroy()
Interceptors That Do Not Modify the Message Locate
A sample code for a simple header-checking interceptor is in Example 118. Note that HTTP headers, not SOAP headers, are being checked.
| Important |
|---|---|
This example only works on the server side. Do not use it on the client side. | |
Example 118. HTTP Header-Checking Interceptor
// Copyright WSO2 Inc. All rights reserved.
// Use is subject to license terms.
package example.processing.interceptor;

import org.idoox.config.Configurable;

import org.idoox.transport.Connection;
import org.idoox.transport.InputMessage;

import org.idoox.wasp.WaspInternalException;
import org.idoox.wasp.interceptor.InterceptorChain;
import org.idoox.wasp.interceptor.TransportInterceptor;

import java.io.IOException;


public class HTTPHeaderCheckingInterceptor implements TransportInterceptor {
    public void intercept(
        Connection connection,
        InterceptorChain chain,
        int position) throws IOException {
        InputMessage imsg = connection.getInputMessage();

        if (imsg != null) {
            String header = imsg.getStringHeader("my-header");

            if (header == null) {
                // there should be an IOException in the future ...
                throw new RuntimeException(
                    "Expected header 'my-header' not found in the message !");
            }
        }
    }

    public void load(Configurable config) throws WaspInternalException {
        // no initialization required
    }

    public void destroy() {
        // no destroy required
    }
}
Interceptors That Modify the Message Locate
Any number of interceptors can exist for a service endpoint. Each interceptor is in a position in InterceptorChain, indicated by the position parameter. The interceptor with the lowest position gets the message and performs its action. It then sends the message to the next interceptor in the chain.
The method intercept() is called on all interceptors in InterceptorChain every time a message arrives. For interceptors that modify the message, intercept() uses message wrappers to set up the route for the message through all the interceptors in the chain.
After a route is set-up, WSO2 SOA Enablement Server starts to read data from the last interceptor in the chain.
Working with Messages Locate
The method intercept() has the parameters Connection, InterceptorChain and position (see Javadoc for TransportInterceptor ). The most important parameter is Connection. This represents a connection on the transport level. It enables you to work with Input/Output messages represented by the classes InputMessage (extends InputStream) and OutputMessage (extends OutputStream). You cannot work directly with Input/OutputStream (one reason being that OutputMessage does not exist yet), so instead you use Input/OutputMessageWrapper (which extends Input/OutputMessage).
The following steps show how to work with MessageWrappers (using code from Example 119 ):
Create InputMessageWrapper (GUNZIPMessage for this example). More information on MessageWrappers follows.
Get the InputMessage from Connection:
InputMessage inmsg = Connection.getInputMessage()
Set the InputMessage from step 2 into InputMessageWrapper and set the Wrapper as the new input message:
connection.setInputMessage(new GUNZIPMessage(inmsg))
Steps to setup connections for OutputMessage are similar.
Working with Message Wrappers Locate
First you have to overload the constructor in the newly created wrapper GUNZIPMessage (InputMessage inmsg) and pass inmsg to its ancestor, super(inmsg). The next step is to overload appropriate methods of the wrapper. There are two approaches:
Overload all read() methods. This is a pure streamed approach and is not suitable for situations when we need to know the complete message. However, it is the most efficient approach for operations such as dumping messages into files. For further information, see the Interceptor demo.
Use the methods setWrappedStream(), getWrappedStream() and initStream() to manipulate the input/output stream.
The method initStream() is called before any operation on the stream is performed. Inside this method you need to:
Get a Stream (from previous Interceptor) - getWrappedStream()
Read and modify data from the Stream
From the result of step 2 create a Stream again and set it through the method setWrappedStream()as a new InputMessage
The second approach is used in Example 119 , below. It is contained in the code setWrappedStream(new GZIPInputStream(getWrappedStream())). It compresses and decompresses a SOAP message with the GZIP algorithm.
The wrapper for the OutputMessage is similar.
Example 119. Content Modifying Interceptor
// Copyright WSO2 Inc. All rights reserved.
// Use is subject to license terms.
package example.processing.interceptor;

import org.idoox.transport.Connection;
import org.idoox.transport.InputMessage;
import org.idoox.transport.InputMessageWrapper;
import org.idoox.transport.OutputMessage;
import org.idoox.transport.OutputMessageWrapper;

import org.idoox.wasp.interceptor.InterceptorChain;
import org.idoox.wasp.interceptor.TransportInterceptor;

import java.io.IOException;

import java.util.zip.GZIPInputStream;
import java.util.zip.GZIPOutputStream;


public class CompressingInterceptor implements TransportInterceptor {
    public void intercept(
        Connection connection,
        InterceptorChain chain,
        int position) throws IOException {
        InputMessage inmsg = connection.getInputMessage();

        if (inmsg != null) {
            connection.setInputMessage(new GUNZIPMessage(inmsg));
        }

        OutputMessage outmsg = connection.getOutputMessage();

        if (outmsg != null) {
            connection.setOutputMessage(new GZIPMessage(outmsg));
        }
    }

    public void load(org.idoox.config.Configurable config)
        throws org.idoox.wasp.WaspInternalException {
    }

    public void destroy() {
    }
}


class GUNZIPMessage extends InputMessageWrapper {
    GUNZIPMessage(InputMessage inmsg) throws IOException {
        super(inmsg);
    }

    protected void initStream() throws IOException {
        setWrappedStream(new GZIPInputStream(getWrappedStream()));
    }
}


class GZIPMessage extends OutputMessageWrapper {
    GZIPMessage(OutputMessage outmsg) throws IOException {
        super(outmsg);

        // should set header ...
    }

    protected void initStream() throws IOException {
        setWrappedStream(new GZIPOutputStream(getWrappedStream()));
    }
}
Interceptor Initialization Locate
An interceptor is initialized using an instance of the org.idoox.config.Configurable interface. To read the configuration, create the interface containing get accessors for configuration parts. To write the configuration, add set methods to the interface, as shown in Example 120. This shows an interceptor that checks whether the client accessing the server is from one of the predefined computers, then stores the number of hits from each computer.
Example 120. Interface Initializing the
// Copyright WSO2 Inc. All rights reserved.
// Use is subject to license terms.
package examples.processing.interceptor;

public interface AccessConfig {
    GuestConfig[] getGuestComputer();

    interface GuestConfig {
        public String getClientAddress(); // read-only item

        public Integer getAccessCount();

        public void setAccessCount(Integer accessCount);
    }
}
Example 121. Using Configuration of an Interceptor - Interceptor Code
// Copyright WSO2 Inc. All rights reserved.
// Use is subject to license terms.
package example.processing.interceptor;

import org.idoox.config.Configurable;

import org.idoox.transport.Connection;
import org.idoox.transport.server.ServerConnection;

import org.idoox.wasp.WaspInternalException;
import org.idoox.wasp.interceptor.InterceptorChain;
import org.idoox.wasp.interceptor.StopProcessingException;
import org.idoox.wasp.interceptor.TransportInterceptor;

import java.io.IOException;


public class AccessInterceptor implements TransportInterceptor {
    AccessConfig.GuestConfig[] accesses;

    publicvoid load(Configurable config) throws WaspInternalException {
        AccessConfig ac = (AccessConfig) config.narrow(AccessConfig.class);
        accesses = ac.getGuestComputer();
    }

    publicvoid destroy() {
        // nothing needed here
    }

    public void intercept(
        Connection connection,
        InterceptorChain chain,
        int position) throws IOException,
        StopProcessingException {
        String clientAddress =
            ((ServerConnection) connection).getClientAddress();

        for (int guestIndex = 0; guestIndex < accesses.length; guestIndex++) {
            if (accesses[guestIndex].getClientAddress()
                                    .equals(clientAddress)) {
                Integer ac = accesses[guestIndex].getAccessCount();

                if (ac == null) {
                    ac = new Integer(1); // not set up
                } else {
                    ac = new Integer(ac.intValue() + 1);
                }

                accesses[guestIndex].setAccessCount(ac);
                System.out.println("Client " + clientAddress
                    + " has accessed the service " + ac + " times");

                return;
            }
        }

        // this exception should be changed in the future to IOException
        throw new IOException("Unconfigured client address " + clientAddress);
    }
}
Interceptor Configuration Locate
The last step to use an interceptor is to mention it in the configuration of WSO2 SOA Enablement Server. This means either:
Creating a processing section in the deployment descriptor,adding the interceptor into this section and setting the configured processing for a service, or
Using the runtime API to install the interceptor for one instance/service.
Server-Side Configuration Locate
Example 122 shows server-side configuration (configuration of AccessInterceptor from the previous section) together with a simple hello world service. After deploying the package to the server (using deploy/undeploy command-line tool), the AccessInterceptor is installed. It can be used immediately.
Example 122. Configuration of Server-Side Interceptor Together With Service
<?xml version="1.0" encoding="UTF-8"?>
<package name="ExampleInterceptorServerSideConfiguration"
  targetNamespace="http://wso2.com/package/example/processing/interceptor"
  version="1.0" xmlns="http://wso2.com/wasp/package/1.2"
  xmlns:tns="http://wso2.com/package/example/processing/interceptor">
  <license>http://wso2.com</license>
  <processing name="MyServiceProcessing">
    <interceptor direction="in out"
      implementation-class="example.processing.interceptor.AccessInterceptor"
      name="AccessInterceptor">
      <guestComputer clientAddress="localhost" xmlns="http://my.org"/>
        <!-- modify to your host name & network-->
        <guestComputer clientAddress="blah-port" xmlns="http://my.org"/>
    </interceptor>
  </processing>
</package>
Client-Side Configuration Locate
Example 123 shows how to configure an interceptor for use on the client side. First, create a client package with a deployment descriptor. Then, to use it, just place the package into the client's classpath.
Example 123. Configuration of Client-Side Interceptor
<?xml version="1.0" encoding="UTF-8"?>
<package client-package="true" name="ExampleInterceptorClientSideConfiguration"
  targetNamespace="http://wso2.com/package/example/processing/interceptor"
  version="1.0" xmlns="http://wso2.com/wasp/package/1.2"
  xmlns:tns="http://wso2.com/package/example/processing/interceptor">
  <license>http://wso2.com</license>
  <processing name="MyServiceProcessing">
    <interceptor direction="in out"
   implementation-class="example.processing.interceptor.HeaderAddingInterceptor"
      name="HeaderAddingInterceptor"/>
  </processing>
  <service-client processing="tns:MyServiceProcessing"
    url="http://localhost:6060/demo/basic/HelloService"/>
</package>
Runtime Installation of an Interceptor Locate
If you want to add an interceptor at runtime, use the API from Example 124 .
| Note |
|---|---|
Note that in this style of adding an interceptor, initialization/destroy is the responsibility of the user. | |
Example 124. Runtime Registration of an Interceptor
// Copyright WSO2 Inc. All rights reserved.
// Use is subject to license terms.
package example.processing.interceptor;

import example.basics.invocation.HelloService;

import example.basics.webservices.HelloServiceImpl;

import org.systinet.wasp.Wasp;
import org.systinet.wasp.webservice.Interceptors;
import org.systinet.wasp.webservice.Registry;
import org.systinet.wasp.webservice.ServiceClient;
import org.systinet.wasp.webservice.ServiceEndpoint;


public class HeaderCheckingInterceptorMain {
    static String serverURL = "http://localhost:6060";
    static String servicePath = "/example/processing/HelloService";
    static String serviceWSDLPath = "/example/processing/HelloService/wsdl";

    public static void main(String[] args) throws Exception {
        // creates a wasp server
        // initialize WASP and start server like 'HTTP'
        Wasp.startServer(serverURL);
        System.out.println(
            "Publishing hello service together with the header-checking" +
            "interceptor");

        // create endpoint intialized by httpServicePath
        ServiceEndpoint serviceEndpoint =
            ServiceEndpoint.create(servicePath, HelloServiceImpl.class);

        // insert interceptor
        serviceEndpoint.getInterceptors()
                       .insert(
            new HeaderCheckingInterceptor(),
            Interceptors.DIRECTION_IN);

        // publish HelloServiceImpl on path '/example/processing/HelloService'
        Registry.publish(serviceEndpoint);
        System.out.println(
            "Service started, calling the first" +
            "client without the header ... ");

        try {
            // lookup service
            HelloService s =
                (HelloService) Registry.lookup(
                    Wasp.getAbsolutePath("http", serviceWSDLPath),
                    HelloService.class);

            //call service
            String ret = s.hello("hello !");
            System.out.println("Strange, call ok, return value " + ret);
        } catch (Exception e) {
            System.out.println("(expected) exception thrown : " + e);
        }

        System.out.println("Repeating the call with the header set up ... ");

        try {
            // create service client
            ServiceClient serviceClient =
                ServiceClient.create(
                    Wasp.getAbsolutePath("http", serviceWSDLPath));

            // insert interceptor
            serviceClient.getInterceptors()
                         .insert(
                new HeaderAddingInterceptor(),
                Interceptors.DIRECTION_INOUT);

            // lookup service
            HelloService s =
                (HelloService) serviceClient.createProxy(HelloService.class);

            // call service
            System.out.println("Call ok, return value " + s.hello("hello !"));
        } catch (Exception e) {
            System.err.println("(unexpected) exception thrown : " + e);
        }

        System.out.println("Shutting down wasp");
        Wasp.destroy();
    }
}